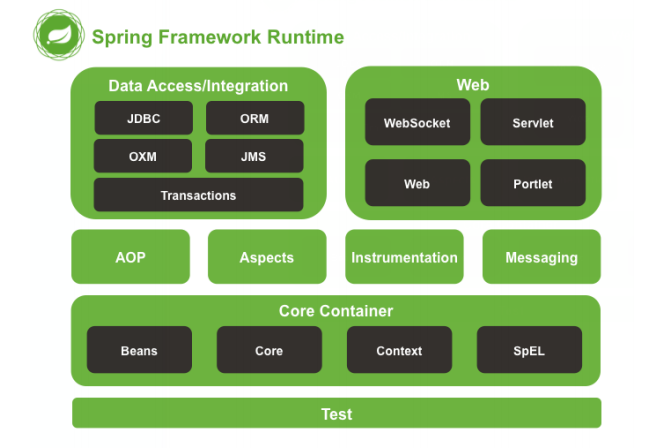
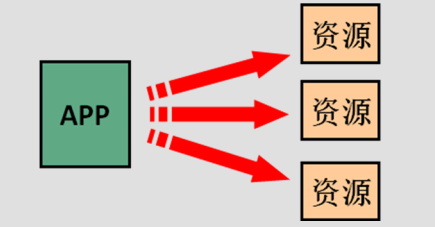
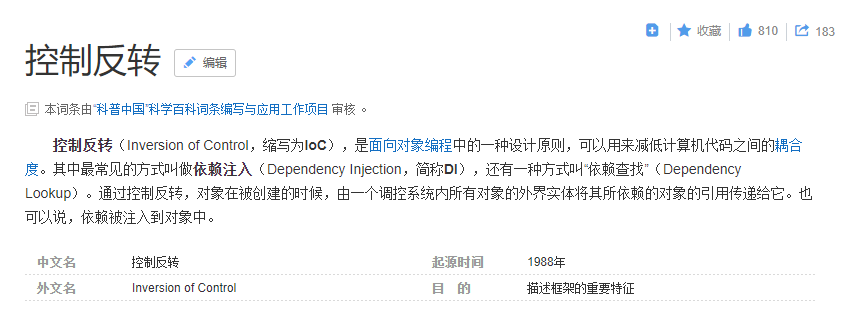
1.Spring 概述 spring 是什么 Spring 是分层的 Java SE/EE 应用 full-stack 轻量级开源框架,以 IOC(Inverse Of Control:反转控制)和 AOP(Aspect Oriented Programming:面向切面编程)为内核 ,提供了展现层 SpringMVC 和持久层 Spring JDBC 以及业务层事务管理等众多的企业级应用技术,还能整合开源世界众多著名的第三方框架和类库,逐渐成为使用最多的 Java EE 企业应用开源框架。
Spring 的发展历程 1997 年 IBM 提出了 EJB 的思想Rod Johnson(spring 之父) 2017 年 9 月份发布了 spring 的最新版本 spring 5.0 通用版(GA)
spring 的优势 方便解耦,简化开发
AOP 编程的支持
声明式事务的支持
方便程序的测试
方便集成各种优秀框架
降低 JavaEE API 的使用难度
Java 源码是经典学习范例
spring 的体系结构
2.IOC 的概念和作用 什么是程序的耦合 耦合性(Coupling) ,也叫耦合度 ,是对模块间关联程度的度量。耦合的强弱取决于模块间接口的复杂性、调用模块的方式以及通过界面传送数据的多少。模块间的耦合度是指模块之间的依赖关系,包括控制关系、调用关系、数据传递关系。模块间联系越多,其耦合性越强,同时表明其独立性越差( 降低耦合性,可以提高其独立性)。耦合性存在于各个领域,而非软件设计中独有的,但是我们只讨论软件工程中的耦合。
在软件工程中,耦合指的就是就是对象之间的依赖性。对象之间的耦合越高,维护成本越高。因此对象的设计应使类和构件之间的耦合最小。软件设计中通常用耦合度和内聚度作为衡量模块独立程度的标准。划分模块的一个准则就是高内聚低耦合。
它有如下分类:
总结:
内聚与耦合
内聚和耦合是密切相关的,同其他模块存在高耦合的模块意味着低内聚,而高内聚的模块意味着该模块同其他模块之间是低耦合。在进行软件设计时,应力争做到高内聚,低耦合。我们在开发中,有些依赖关系是必须的,有些依赖关系可以通过优化代码来解除的。
请看下面的示例代码:
1 2 3 4 5 6 7 public class AccountServiceImpl implements IAccountService private IAccountDao accountDao = new AccountDaoImpl(); }
上面的代码表示:业务层调用持久层,并且此时业务层在依赖持久层的接口和实现类。如果此时没有持久层实现类,编译将不能通过。这种编译期依赖关系,应该在我们开发中杜绝。我们需要优化代码解决。
再比如: DriverManager 的 register 方法,而是采用 Class.forName 的方式?
1
2
3
4
5
6
7
8
9
10
11
12
13
14
15
public class JdbcDemo public static void main (String[] args) throws Exception Class.forName("com.mysql.jdbc.Driver" ); } }
原因就是:
解决程序耦合的思路 当是我们讲解 JDBC 时,是通过反射来注册驱动的,代码如下:
1 Class.forName("com.mysql.jdbc.Driver" );
此时的好处是,我们的类中不再依赖具体的驱动类,此时就算删除 MySql 的驱动 jar 包,依然可以编译(运行就不要想了,没有驱动不可能运行成功的)。
Mysql 驱动的全限定类名字符串是在 java 类中写死的,一旦要改还是要修改源码。解决这个问题也很简单,使用配置文件配置。
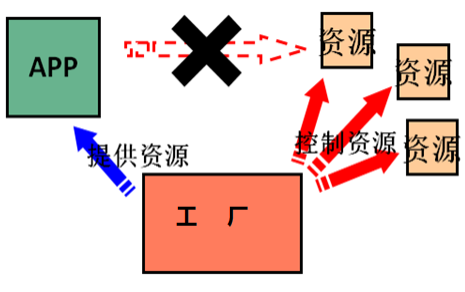
工厂模式解耦 在实际开发中我们可以把三层的对象都使用配置文件配置起来,当启动服务器应用加载的时候,让一个类中的方法通过读取配置文件,把这些对象创建出来 并存 工厂
控制反转-Inversion Of Control 上一小节解耦的思路有 2 个问题:并存 容器。
2.什么是工厂?
原来 :我们在获取对象时,都是采用 new 的方式。是主动的。
现在 : 我们获取对象时,同时跟工厂要,有工厂为我们查找或者创建对象。是被动的。
这种被动接收的方式获取对象的思想 就是控制反转,它是 spring 框架的核心之一 。
明确 IOC 的作用 :削减计算机程序的耦合(解除我们代码中的依赖关系)。
3.使用IOC解耦(XML) 环境搭建 本章我们使用的案例是,账户的业务层和持久层的依赖关系解决。在开始 spring 的配置之前,我们要先准备一下环境。由于我们是使用 spring 解决依赖关系,并不是真正的要做增删改查操作,所以此时我们没必要写实体类。并且我们在此处使用的是 java Maven工程,不是 java web 工程。
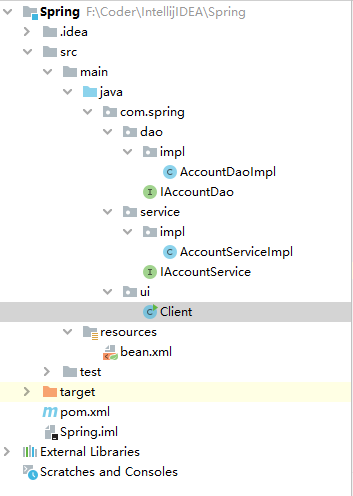
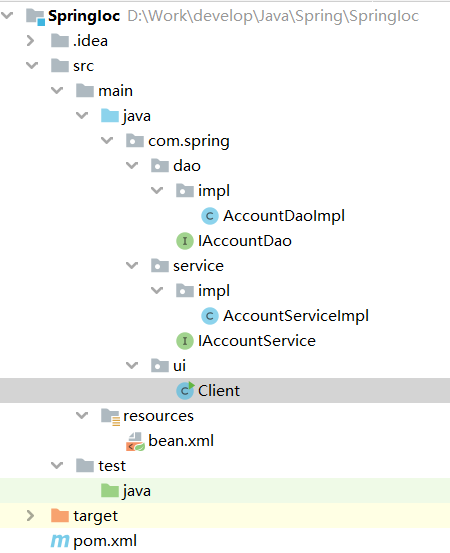
案例目录结构
让Spring管理资源,在配置文件中配置 service 和 dao,修改bean.xml
1
2
3
4
5
6
7
8
9
10
<?xml version="1.0" encoding="UTF-8" ?> <beans xmlns="http://www.springframework.org/schema/beans" xmlns:xsi="http://www.w3.org/2001/XMLSchema-instance" xsi:schemaLocation="http://www.springframework.org/schema/beans http://www.springframework.org/schema/beans/spring-beans.xsd" > <!--把对象的创建交给spring来管理,当前实例化bean的方式:使用默认无参构造函数--> <bean id="accountService" class="com.spring.service.impl.AccountServiceImpl"></bean> <bean id="accountDao" class="com.spring.dao.impl.AccountDaoImpl"></bean> </beans>
IAccountDao
1
2
3
4
5
6
public interface IAccountDao void saveAccount () }
AccountDaoImpl
1
2
3
4
5
6
public class AccountDaoImpl implements IAccountDao @Override public void saveAccount () System.out.println("保存了账户" ); } }
IAccountService
1
2
3
4
5
6
public interface IAccountService void saveAccount () }
AccountServiceImpl
1
2
3
4
5
6
7
8
9
10
11
12
13
public class AccountServiceImpl implements IAccountService private IAccountDao accountDao ; public AccountServiceImpl () System.out.println("对象创建了" ); } @Override public void saveAccount () accountDao.saveAccount(); } }
Client
1 2 3 4 5 6 7 8 9 10 11 12 13 14 15 16 17 18 19 20 21 22 23 24 25 26 27 28 29 public class Client public static void main (String[] args) ApplicationContext ac = new ClassPathXmlApplicationContext("bean.xml" ); IAccountService as = (IAccountService)ac.getBean("accountService" ); IAccountDao adao = ac.getBean("accountDao" ,IAccountDao.class); System.out.println(as); System.out.println(adao); adao.saveAccount(); } }
运行结果:
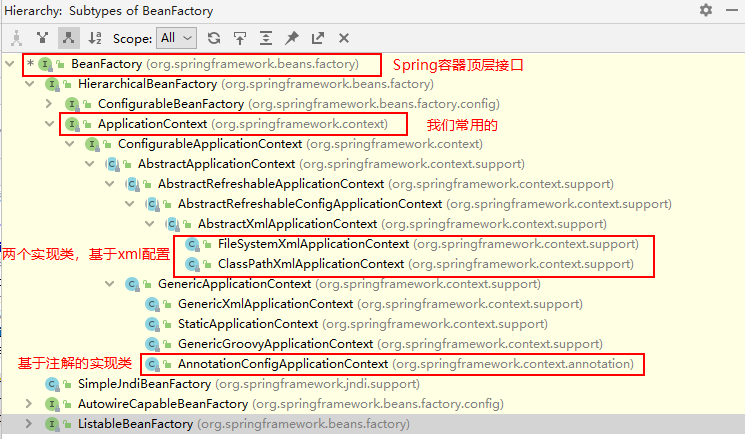
核心容器的两个接口引发出的问题: ApplicationContext:它在构建核心容器时,创建对象采取的策略是采用立即加载的方式。也就是说,只要一读取完配置文件马上就创建配置文件中配置的对象。单例对象适用,可以采用此接口。BeanFactory:它在构建核心容器时,创建对象采取的策略是采用延迟加载的方式。也就是说,什么时候根据id获取对象了,什么时候才真正的创建对象。适合多例对象使用
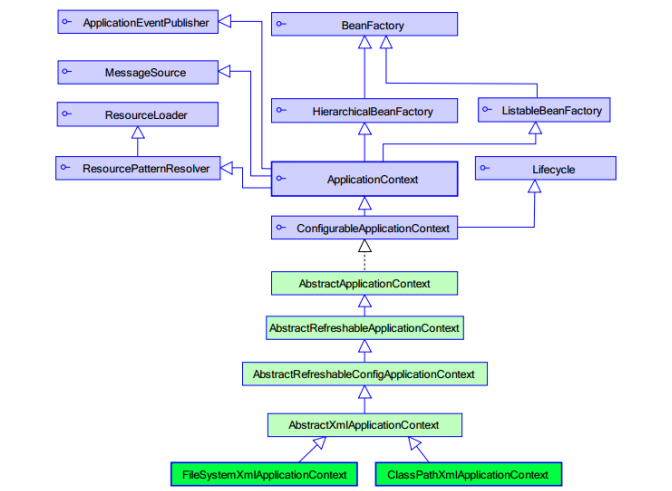
Spring 中工厂的类结构图
BeanFactory 和 ApplicationContext 的区别
区别: 创建对象的时间点不一样。
ApplicationContext:只要一读取配置文件,默认情况下就会创建对象。
BeanFactory:什么时候使用,什么时候创建对象。
ApplicationContext 接口的实现类 ClassPathXmlApplicationContext:它是从类的根路径下加载配置文件,推荐使用这种FileSystemXmlApplicationContext:它是从磁盘路径上加载配置文件,配置文件可以在磁盘的任意位置。AnnotationConfigApplicationContext:当我们使用注解配置容器对象时,需要使用此类来创建 spring 容器。它用来读取注解。
bean 标签和管理对象细节 bean 标签 作用 :用于配置对象让 spring 来创建的。默认情况下 它调用的是类中的无参构造函数。如果没有无参构造函数则不能创建成功。
属性 id:给对象在容器中提供一个唯一标识。用于获取对象。class:指定类的全限定类名。用于反射创建对象。默认情况下调用无参构造函数。scope:指定对象的作用范围。
singleton :默认值,单例的。 prototype :多例的。 request :WEB 项目中,Spring 创建一个 Bean 的对象,将对象存入到 request 域中.
session :WEB 项目中,Spring 创建一个 Bean 的对象,将对象存入到 session 域中.
global session :WEB 项目中,应用在 Portlet 环境.如果没有 Portlet 环境那么globalSession 相当于 session。
init-method:指定类中的初始化方法名称。destroy-method:指定类中销毁方法名称。
bean 的作用范围和生命周期 单例对象:scope=”singleton”
对象出生:当应用加载,创建容器时,对象就被创建了。
对象活着:只要容器在,对象一直活着。
对象死亡:当应用卸载,销毁容器时,对象就被销毁了。
多例对象:scope=”prototype”
对象出生:当使用对象时,创建新的对象实例。
对象活着:只要对象在使用中,就一直活着。
对象死亡:当对象长时间不用时,被 java 的垃圾回收器回收了。
实例化(注入)Bean 的三种方式 第一种方式:使用默认无参构造函数
1 2 3 <bean id ="accountService" class ="com.spring.service.impl.AccountServiceImpl" />
第二种方式:spring 管理静态工厂-使用静态工厂的方法创建对象
1 2 3 4 5 6 7 8 public class StaticFactory { public static IAccountService createAccountService(){ return new AccountServiceImpl(); } } <bean id ="accountService" class ="com.spring.factory.StaticFactory" factory-method ="createAccountService" > </bean >
第三种方式:spring 管理实例工厂-使用实例工厂的方法创建对象
1
2
3
4
5
6
7
8
public class InstanceFactory { public IAccountService createAccountService(){ return new AccountServiceImpl(); } } <bean id ="instancFactory" class ="com.spring.factory.InstanceFactory" > </bean > <bean id ="accountService" factory-bean ="instancFactory" factory-method ="createAccountService" > </bean >
Spring 的依赖注入 依赖注入的概念 依赖注入:Dependency Inje ction 。它是 spring 框架核心 IOC 的具体实现。
我们的程序在编写时,通过控制反转,把对象的创建交给了 spring,但是代码中不可能出现没有依赖的情况。ioc 解耦只是降低他们的依赖关系,但不会消除。例如:我们的业务层仍会调用持久层的方法。
那这种业务层和持久层的依赖关系,在使用 spring 之后,就让 spring 来维护了。
简单的说,就是坐等框架把持久层对象传入业务层,而不用我们自己去获取。
构造函数注入 顾名思义,就是使用类中的构造函数,给成员变量赋值。注意,赋值的操作不是我们自己做的,而是通过配置的方式,让 spring 框架来为我们注入。具体代码如下:
1
2
3
4
5
6
7
8
9
10
11
12
13
14
15
public class AccountServiceImpl implements IAccountService private String name; private Integer age; private Date birthday; public AccountServiceImpl (String name, Integer age, Date birthday) this .name = name; this .age = age; this .birthday = birthday; } @Override public void saveAccount () System.out.println(name+"," +age+"," +birthday); } }
使用构造函数的方式,给 service 中的属性传值。constructor-arg
index :指定参数在构造函数参数列表的索引位置type :指定参数在构造函数中的数据类型name :指定参数在构造函数中的名称 用这个找给谁赋值value :它能赋的值是基本数据类型和 String 类型ref :它能赋的值是其他 bean 类型,也就是说,必须得是在配置文件中配置过的 bean
1 2 3 4 5 6 <bean id ="accountService" class ="com.spring.service.impl.AccountServiceImpl" > <constructor-arg name ="name" value ="张三" > </constructor-arg > <constructor-arg name ="age" value ="18" > </constructor-arg > <constructor-arg name ="birthday" ref ="now" > </constructor-arg > </bean > <bean id ="now" class ="java.util.Date" > </bean >
测试:调用saveAccount方法
1
2
3
4
5
6
7
8
public static void main (String[] args) ApplicationContext ac = new ClassPathXmlApplicationContext("bean.xml" ); IAccountService as = (IAccountService)ac.getBean("accountService" ); as.saveAccount(); }
set 方法注入 顾名思义,就是在类中提供需要注入成员的 set 方法。具体代码如下:
1
2
3
4
5
6
7
8
9
10
11
12
13
14
15
16
17
18
19
20
21
22
public class AccountServiceImpl implements IAccountService private String name; private Integer age; private Date birthday; public void setName (String name) this .name = name; } public void setAge (Integer age) this .age = age; } public void setBirthday (Date birthday) this .birthday = birthday; } @Override public void saveAccount () System.out.println(name + "," + age + "," + birthday); } }
通过配置文件给 bean 中的属性传值:使用 set 方法的方式
属性:
name :找的是类中 set 方法后面的部分ref :给属性赋值是其他 bean 类型的value :给属性赋值是基本数据类型和 string 类型的
1 2 3 4 5 6 <bean id ="accountService" class ="com.spring.service.impl.AccountServiceImpl" > <property name ="name" value ="test" > </property > <property name ="age" value ="21" > </property > <property name ="birthday" ref ="now" > </property > </bean > <bean id ="now" class ="java.util.Date" > </bean >
测试:调用saveAccount方法
1
2
3
4
5
6
7
8
public static void main (String[] args) ApplicationContext ac = new ClassPathXmlApplicationContext("bean.xml" ); IAccountService as = (IAccountService)ac.getBean("accountService" ); as.saveAccount(); }
使用 p 名称空间注入数据 此种方式是通过在 xml 中导入 p 名称空间,使用 p:propertyName 来注入数据,它的本质仍然是调用类中的set 方法实现注入功能。
1
2
3
4
5
6
7
8
9
10
11
12
13
14
15
16
17
18
19
20
21
22
public class AccountServiceImpl implements IAccountService private String name; private Integer age; private Date birthday; public void setName (String name) this .name = name; } public void setAge (Integer age) this .age = age; } public void setBirthday (Date birthday) this .birthday = birthday; } @Override public void saveAccount () System.out.println(name + "," + age + "," + birthday); } }
1 2 3 4 5 6 7 8 9 10 <beans xmlns ="http://www.springframework.org/schema/beans" xmlns:p ="http://www.springframework.org/schema/p" xmlns:xsi ="http://www.w3.org/2001/XMLSchema-instance" xsi:schemaLocation =" http://www.springframework.org/schema/beans http://www.springframework.org/schema/beans/spring-beans.xsd" > <bean id ="accountService" class ="com.spring.service.impl.AccountServiceImpl" p:name ="test" p:age ="21" p:birthday-ref ="now" /> <bean name ="now" class ="java.util.Date" > </bean > </beans >
测试:调用saveAccount方法
1
2
3
4
5
6
7
8
public static void main (String[] args) ApplicationContext ac = new ClassPathXmlApplicationContext("bean.xml" ); IAccountService as = (IAccountService)ac.getBean("accountService" ); as.saveAccount(); }
注入集合属性 顾名思义,就是给类中的集合成员传值,它用的也是set方法注入的方式,只不过变量的数据类型都是集合。我们这里介绍注入数组,List,Set,Map,Properties。具体代码如下:
1
2
3
4
5
6
7
8
9
10
11
12
13
14
15
16
17
18
19
20
21
22
23
24
25
26
27
28
29
30
31
32
33
34
35
36
37
38
public class AccountServiceImpl implements IAccountService private String[] myStrs; private List<String> myList; private Set<String> mySet; private Map<String, String> myMap; private Properties myProps; public void setMyStrs (String[] myStrs) this .myStrs = myStrs; } public void setMyList (List<String> myList) this .myList = myList; } public void setMySet (Set<String> mySet) this .mySet = mySet; } public void setMyMap (Map<String, String> myMap) this .myMap = myMap; } public void setMyProps (Properties myProps) this .myProps = myProps; } @Override public void saveAccount () System.out.println(Arrays.toString(myStrs)); System.out.println(myList); System.out.println(mySet); System.out.println(myMap); System.out.println(myProps); } }
注入集合数据:
List 结构的:
Map 结构的
1 2 3 4 5 6 7 8 9 10 11 12 13 14 15 16 17 18 19 20 21 22 23 24 25 26 27 28 29 30 31 32 33 34 35 36 37 38 39 40 41 42 43 44 45 46 47 48 49 50 <beans xmlns ="http://www.springframework.org/schema/beans" xmlns:p ="http://www.springframework.org/schema/p" xmlns:xsi ="http://www.w3.org/2001/XMLSchema-instance" xsi:schemaLocation =" http://www.springframework.org/schema/beans http://www.springframework.org/schema/beans/spring-beans.xsd" > <bean id ="accountService" class ="com.spring.service.impl.AccountServiceImpl" > <property name ="myStrs" > <set > <value > AAA</value > <value > BBB</value > <value > CCC</value > </set > </property > <property name ="myList" > <array > <value > AAA</value > <value > BBB</value > <value > CCC</value > </array > </property > <property name ="mySet" > <list > <value > AAA</value > <value > BBB</value > <value > CCC</value > </list > </property > <property name ="myMap" > <props > <prop key ="testA" > aaa</prop > <prop key ="testB" > bbb</prop > </props > </property > <property name ="myProps" > <map > <entry key ="testA" value ="aaa" > </entry > <entry key ="testB" > <value > bbb</value > </entry > </map > </property > </bean > </beans >
测试:调用saveAccount方法
1
2
3
4
5
6
7
8
public static void main (String[] args) ApplicationContext ac = new ClassPathXmlApplicationContext("bean.xml" ); IAccountService as = (IAccountService)ac.getBean("accountService" ); as.saveAccount(); }
使用IoC实现账户的CRUD 环境搭建
数据库脚本 1 2 3 4 5 6 7 8 9 create table account( id int primary key auto_increment, name varchar (40 ), money float )character set utf8 collate utf8_general_ci; insert into account(name,money) values ('aaa' ,1000 );insert into account(name,money) values ('bbb' ,1000 );insert into account(name,money) values ('ccc' ,1000 );
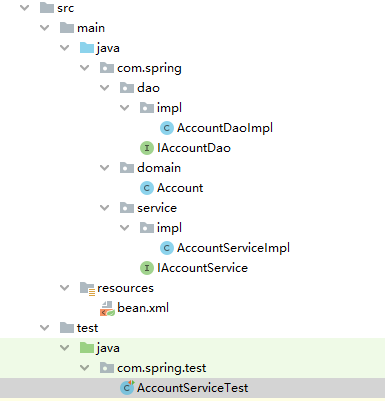
工程搭建 创建一个maven工程,目录结构如下:
pom文件
1 2 3 4 5 6 7 8 9 10 11 12 13 14 15 16 17 18 19 20 21 22 23 24 25 26 27 28 29 30 31 32 33 34 35 36 37 38 39 40 41 42 43 44 45 46 47 <?xml version="1.0" encoding="UTF-8"?> <project xmlns ="http://maven.apache.org/POM/4.0.0" xmlns:xsi ="http://www.w3.org/2001/XMLSchema-instance" xsi:schemaLocation ="http://maven.apache.org/POM/4.0.0 http://maven.apache.org/xsd/maven-4.0.0.xsd" > <modelVersion > 4.0.0</modelVersion > <groupId > com.spring</groupId > <artifactId > spring</artifactId > <version > 1.0-SNAPSHOT</version > <packaging > jar</packaging > <dependencies > <dependency > <groupId > org.springframework</groupId > <artifactId > spring-context</artifactId > <version > 5.0.2.RELEASE</version > </dependency > <dependency > <groupId > org.springframework</groupId > <artifactId > spring-test</artifactId > <version > 5.0.2.RELEASE</version > </dependency > <dependency > <groupId > commons-dbutils</groupId > <artifactId > commons-dbutils</artifactId > <version > 1.4</version > </dependency > <dependency > <groupId > mysql</groupId > <artifactId > mysql-connector-java</artifactId > <version > 5.1.6</version > </dependency > <dependency > <groupId > c3p0</groupId > <artifactId > c3p0</artifactId > <version > 0.9.1.2</version > </dependency > <dependency > <groupId > junit</groupId > <artifactId > junit</artifactId > <version > 4.12</version > </dependency > </dependencies > </project >
IAccountService
1 2 3 4 5 6 7 8 9 10 11 12 13 14 15 16 17 18 19 20 21 22 23 24 25 26 27 28 29 30 31 32 33 34 35 public interface IAccountService List<Account> findAllAccount () ; Account findAccountById (Integer accountId) ; void saveAccount (Account account) void updateAccount (Account account) void deleteAccount (Integer acccountId) }
AccountServiceImpl
1 2 3 4 5 6 7 8 9 10 11 12 13 14 15 16 17 18 19 20 21 22 23 24 25 26 27 28 29 30 31 32 33 34 35 36 public class AccountServiceImpl implements IAccountService private IAccountDao accountDao; public void setAccountDao (IAccountDao accountDao) this .accountDao = accountDao; } @Override public List<Account> findAllAccount () return accountDao.findAllAccount(); } @Override public Account findAccountById (Integer accountId) return accountDao.findAccountById(accountId); } @Override public void saveAccount (Account account) accountDao.saveAccount(account); } @Override public void updateAccount (Account account) accountDao.updateAccount(account); } @Override public void deleteAccount (Integer acccountId) accountDao.deleteAccount(acccountId); } }
Account
1 2 3 4 5 6 7 8 9 10 11 12 13 14 15 16 17 18 19 20 21 22 23 24 25 26 27 28 29 30 31 32 33 34 35 36 37 38 39 40 41 42 public class Account implements Serializable private Integer id; private String name; private Float money; public Integer getId () return id; } public void setId (Integer id) this .id = id; } public String getName () return name; } public void setName (String name) this .name = name; } public Float getMoney () return money; } public void setMoney (Float money) this .money = money; } @Override public String toString () return "Account{" + "id=" + id + ", name='" + name + '\'' + ", money=" + money + '}' ; } }
IAccountDao
1 2 3 4 5 6 7 8 9 10 11 12 13 14 15 16 17 18 19 20 21 22 23 24 25 26 27 28 29 30 31 32 33 34 35 public interface IAccountDao List<Account> findAllAccount () ; Account findAccountById (Integer accountId) ; void saveAccount (Account account) void updateAccount (Account account) void deleteAccount (Integer acccountId) }
AccountDaoImpl
1 2 3 4 5 6 7 8 9 10 11 12 13 14 15 16 17 18 19 20 21 22 23 24 25 26 27 28 29 30 31 32 33 34 35 36 37 38 39 40 41 42 43 44 45 46 47 48 49 50 51 52 53 54 55 56 public class AccountDaoImpl implements IAccountDao private QueryRunner runner; public void setRunner (QueryRunner runner) this .runner = runner; } @Override public List<Account> findAllAccount () try { return runner.query("select * from account" ,new BeanListHandler<Account>(Account.class)); }catch (Exception e) { throw new RuntimeException(e); } } @Override public Account findAccountById (Integer accountId) try { return runner.query("select * from account where id = ? " ,new BeanHandler<Account>(Account.class),accountId); }catch (Exception e) { throw new RuntimeException(e); } } @Override public void saveAccount (Account account) try { runner.update("insert into account(name,money)values(?,?)" ,account.getName(),account.getMoney()); }catch (Exception e) { throw new RuntimeException(e); } } @Override public void updateAccount (Account account) try { runner.update("update account set name=?,money=? where id=?" ,account.getName(),account.getMoney(),account.getId()); }catch (Exception e) { throw new RuntimeException(e); } } @Override public void deleteAccount (Integer accountId) try { runner.update("delete from account where id=?" ,accountId); }catch (Exception e) { throw new RuntimeException(e); } } }
bean.xml
1 2 3 4 5 6 7 8 9 10 11 12 13 14 15 16 17 18 19 20 21 22 23 24 25 26 27 28 29 30 31 32 <?xml version="1.0" encoding="UTF-8"?> <beans xmlns ="http://www.springframework.org/schema/beans" xmlns:xsi ="http://www.w3.org/2001/XMLSchema-instance" xsi:schemaLocation ="http://www.springframework.org/schema/beans http://www.springframework.org/schema/beans/spring-beans.xsd" > <bean id ="accountService" class ="com.spring.service.impl.AccountServiceImpl" > <property name ="accountDao" ref ="accountDao" > </property > </bean > <bean id ="accountDao" class ="com.spring.dao.impl.AccountDaoImpl" > <property name ="runner" ref ="runner" > </property > </bean > <bean id ="runner" class ="org.apache.commons.dbutils.QueryRunner" scope ="prototype" > <constructor-arg name ="ds" ref ="dataSource" > </constructor-arg > </bean > <bean id ="dataSource" class ="com.mchange.v2.c3p0.ComboPooledDataSource" > <property name ="driverClass" value ="com.mysql.jdbc.Driver" > </property > <property name ="jdbcUrl" value ="jdbc:mysql://localhost:3306/spring" > </property > <property name ="user" value ="root" > </property > <property name ="password" value ="1234" > </property > </bean > </beans >
测试类
1 2 3 4 5 6 7 8 9 10 11 12 13 14 15 16 17 18 19 20 21 22 23 24 25 26 27 28 29 30 31 32 33 34 35 36 37 38 39 40 41 42 43 44 45 46 47 48 49 50 @RunWith(SpringJUnit4ClassRunner.class) @ContextConfiguration(locations = "classpath:bean.xml") public class AccountServiceTest @Autowired private IAccountService as; @Test public void testFindAll () List<Account> accounts = as.findAllAccount(); for (Account account : accounts){ System.out.println(account); } } @Test public void testFindOne () Account account = as.findAccountById(1 ); System.out.println(account); } @Test public void testSave () Account account = new Account(); account.setName("test" ); account.setMoney(12345f ); as.saveAccount(account); } @Test public void testUpdate () Account account = as.findAccountById(4 ); account.setMoney(23456f ); as.updateAccount(account); } @Test public void testDelete () as.deleteAccount(4 ); } }
4.使用IOC解耦(注解) 学习基于注解的 IoC 配置,大家脑海里首先得有一个认知,即注解配置和 xml 配置要实现的功能都是一样的,都是要降低程序间的耦合。只是配置的形式不一样。关于实际的开发中到底使用xml还是注解,每家公司有着不同的使用习惯。所以这两种配置方式我们都需要掌握。
环境搭建 创建一个Maven工程,目录结构如下:
Pom文件配置如下:
1 2 3 4 5 6 7 8 9 10 11 12 13 14 15 16 17 18 19 <?xml version="1.0" encoding="UTF-8"?> <project xmlns ="http://maven.apache.org/POM/4.0.0" xmlns:xsi ="http://www.w3.org/2001/XMLSchema-instance" xsi:schemaLocation ="http://maven.apache.org/POM/4.0.0 http://maven.apache.org/xsd/maven-4.0.0.xsd" > <modelVersion > 4.0.0</modelVersion > <groupId > com.spring</groupId > <artifactId > SpringIoc</artifactId > <version > 1.0-SNAPSHOT</version > <packaging > jar</packaging > <dependencies > <dependency > <groupId > org.springframework</groupId > <artifactId > spring-context</artifactId > <version > 5.0.2.RELEASE</version > </dependency > </dependencies > </project >
Bean配置文件:
1 2 3 4 5 6 <?xml version="1.0" encoding="UTF-8"?> <beans xmlns ="http://www.springframework.org/schema/beans" xmlns:xsi ="http://www.w3.org/2001/XMLSchema-instance" xsi:schemaLocation ="http://www.springframework.org/schema/beans http://www.springframework.org/schema/beans/spring-beans.xsd" ></beans >
IAccountDao
1 2 3 4 5 6 7 8 9 10 public interface IAccountDao void saveAccount () }
AccountDaoImp
1 2 3 4 5 6 7 8 9 10 public class AccountDaoImpl implements IAccountDao public void saveAccount () System.out.println("保存了账户" ); } }
IAccountService
1 2 3 4 5 6 7 8 9 10 public interface IAccountService void saveAccount () }
AccountServiceImpl
1 2 3 4 5 6 7 8 9 10 11 12 13 14 15 public class AccountServiceImpl implements IAccountService private IAccountDao accountDao ; public AccountServiceImpl () System.out.println("对象创建了" ); } public void saveAccount () accountDao.saveAccount(); } }
测试类
1 2 3 4 5 6 public class Client public static void main (String[] args) ApplicationContext ac = new ClassPathXmlApplicationContext("bean.xml" ); } }
常用注解 用于创建对象的 相当于XML中:<bean id=”” class=””>
Component Controller、Service、Repository @Component
作用:把资源让 spring 来管理。相当于在 xml 中配置一个 bean。把当前使用@Component注解的类对象存入Spring容器中。
属性:
测试案例1 :
@Component不指定Value值 :找到AccountServiceImpl ,添加@Component注解,代码如下:
1 2 3 4 5 6 7 8 9 10 11 12 13 14 15 16 @Component public class AccountServiceImpl implements IAccountService private IAccountDao accountDao ; public AccountServiceImpl () System.out.println("对象创建了" ); } public void saveAccount () accountDao.saveAccount(); } }
修改测试类:
1 2 3 4 5 6 7 8 9 10 11 12 public class Client public static void main (String[] args) ApplicationContext ac = new ClassPathXmlApplicationContext("bean.xml" ); IAccountService as = (IAccountService)ac.getBean("accountServiceImpl" ); System.out.println(as); } }
我们运行Client方法,程序会报错,提示accountServiceImpl这个bean对象是无效的:
这是因为bean.xml,没有对应的配置信息,导致Spring报错。这时候我们只需要告诉Spring创建容器时候,需要扫描哪些包。
修改bean.xml如下:
1 2 3 4 5 6 7 8 9 10 11 12 <?xml version="1.0" encoding="UTF-8"?> <beans xmlns ="http://www.springframework.org/schema/beans" xmlns:xsi ="http://www.w3.org/2001/XMLSchema-instance" xmlns:context ="http://www.springframework.org/schema/context" xsi:schemaLocation ="http://www.springframework.org/schema/beans http://www.springframework.org/schema/beans/spring-beans.xsd http://www.springframework.org/schema/context http://www.springframework.org/schema/context/spring-context.xsd" > <context:component-scan base-package ="com.spring" > </context:component-scan > </beans >
这时候在运行Client方法,就可以运行成功了。
测试案例2 :
@Component指定Value值 :找到AccountServiceImpl ,添加@Component(value = "accountService")注解,代码如下:
1 2 3 4 5 6 7 8 9 10 11 12 13 14 15 16 @Component(value = "accountService") public class AccountServiceImpl implements IAccountService private IAccountDao accountDao ; public AccountServiceImpl () System.out.println("对象创建了" ); } public void saveAccount () accountDao.saveAccount(); } }
修改测试类:
1 2 3 4 5 6 7 8 9 10 11 12 public class Client public static void main (String[] args) ApplicationContext ac = new ClassPathXmlApplicationContext("bean.xml" ); IAccountService as = (IAccountService)ac.getBean("accountServiceImpl" ); System.out.println(as); } }
再次运行,同样会运行成功
细节:如果@Component注解中有且只有一个属性要赋值时,且名称是 value,value 在赋值是可以不写。
@Controller @Service @Repository
他们三个注解都是针对@Component一个的衍生注解,他们的作用及属性都是和@Component一模一样的。他们只不过是提供了更加明确的语义化。
@Controller:一般用于表现层的注解。 @Service:一般用于业务层的注解。 @Repository:一般用于持久层的注解。
细节:如果注解中有且只有一个属性要赋值时,且名称是 value,value 在赋值是可以不写。
修改AccountDaoImpl ,增加@Repository注解。
1 2 3 4 5 6 7 8 9 10 11 @Repository("accountDao") public class AccountDaoImpl implements IAccountDao public void saveAccount () System.out.println("保存了账户" ); } }
修改测试类:
1 2 3 4 5 6 7 8 9 10 11 12 13 14 public class Client public static void main (String[] args) ApplicationContext ac = new ClassPathXmlApplicationContext("bean.xml" ); IAccountService as = (IAccountService)ac.getBean("accountService" ); IAccountDao accountDao=ac.getBean("accountDao" ,IAccountDao.class); System.out.println(as); System.out.println(accountDao); } }
运行成功,说明我们能获取到对象。
用于注入数据的 相当于:<property name=”” ref=””>、<property name=”” value=””>
如果把测试类改成如图所示:
1 2 3 4 5 6 7 8 9 public class Client public static void main (String[] args) ApplicationContext ac = new ClassPathXmlApplicationContext("bean.xml" ); IAccountService as = (IAccountService)ac.getBean("accountService" ); as.saveAccount(); } }
此时运行会报空指针错误,是因为我们没有注入对应的数据
Autowired Qualifier Resource Value @Autowired
作用 :自动按照类型注入。只要容器中有唯一的一个bean对象类型和要注入的变量类型匹配,就可以注入成功。 如果ioc容器中没有任何bean的类型和要注入的变量类型匹配,则报错。出现位置 :可以是变量上,也可以是方法上细节 :在使用注解注入时,set方法就不是必须的了。
我们修改AccountServiceImpl ,增加@Autowired注解:
1 2 3 4 5 6 7 8 9 10 11 12 @Component("accountService") public class AccountServiceImpl implements IAccountService @Autowired private IAccountDao accountDao; public void saveAccount () accountDao.saveAccount(); } }
再次运行测试类,会正常调用saveAccount()方法
1 2 3 4 5 6 7 8 9 public class Client public static void main (String[] args) ApplicationContext ac = new ClassPathXmlApplicationContext("bean.xml" ); IAccountService as = (IAccountService)ac.getBean("accountService" ); as.saveAccount(); } }
此时控制台输出:保存了账户
@Autowired自动按照类型注入,容器中有多个bean对象类型和要注入的变量类型匹配 的情况
在com.spring.dao.impl目录下新建一个文件:
1 2 3 4 5 6 7 8 9 10 11 @Repository("accountDao2") public class AccountDaoImpl2 implements IAccountDao public void saveAccount () System.out.println("保存了账户2222222222222" ); } }
修改AccountDaoImpl 为:
1 2 3 4 5 6 7 8 9 10 11 @Repository("accountDao1") public class AccountDaoImpl implements IAccountDao public void saveAccount () System.out.println("保存了账户1" ); } }
运行测试类
1 2 3 4 5 6 7 8 9 public class Client public static void main (String[] args) ApplicationContext ac = new ClassPathXmlApplicationContext("bean.xml" ); IAccountService as = (IAccountService)ac.getBean("accountService" ); as.saveAccount(); } }
会报如下错误:
1 2 3 4 5 6 7 8 9 10 11 12 13 14 15 16 17 18 19 20 21 22 23 24 警告: Exception encountered during context initialization - cancelling refresh attempt: org.springframework.beans.factory.UnsatisfiedDependencyException: Error creating bean with name 'accountService': Unsatisfied dependency expressed through field 'accountDao'; nested exception is org.springframework.beans.factory.NoUniqueBeanDefinitionException: No qualifying bean of type 'com.spring.dao.IAccountDao' available: expected single matching bean but found 2: accountDao1,accountDao2 Exception in thread "main" org.springframework.beans.factory.UnsatisfiedDependencyException: Error creating bean with name 'accountService': Unsatisfied dependency expressed through field 'accountDao'; nested exception is org.springframework.beans.factory.NoUniqueBeanDefinitionException: No qualifying bean of type 'com.spring.dao.IAccountDao' available: expected single matching bean but found 2: accountDao1,accountDao2 at org.springframework.beans.factory.annotation.AutowiredAnnotationBeanPostProcessor$AutowiredFieldElement.inject(AutowiredAnnotationBeanPostProcessor.java:586) at org.springframework.beans.factory.annotation.InjectionMetadata.inject(InjectionMetadata.java:91) at org.springframework.beans.factory.annotation.AutowiredAnnotationBeanPostProcessor.postProcessPropertyValues(AutowiredAnnotationBeanPostProcessor.java:372) at org.springframework.beans.factory.support.AbstractAutowireCapableBeanFactory.populateBean(AbstractAutowireCapableBeanFactory.java:1344) at org.springframework.beans.factory.support.AbstractAutowireCapableBeanFactory.doCreateBean(AbstractAutowireCapableBeanFactory.java:582) at org.springframework.beans.factory.support.AbstractAutowireCapableBeanFactory.createBean(AbstractAutowireCapableBeanFactory.java:502) at org.springframework.beans.factory.support.AbstractBeanFactory.lambda$doGetBean$0(AbstractBeanFactory.java:312) at org.springframework.beans.factory.support.DefaultSingletonBeanRegistry.getSingleton(DefaultSingletonBeanRegistry.java:228) at org.springframework.beans.factory.support.AbstractBeanFactory.doGetBean(AbstractBeanFactory.java:310) at org.springframework.beans.factory.support.AbstractBeanFactory.getBean(AbstractBeanFactory.java:200) at org.springframework.beans.factory.support.DefaultListableBeanFactory.preInstantiateSingletons(DefaultListableBeanFactory.java:758) at org.springframework.context.support.AbstractApplicationContext.finishBeanFactoryInitialization(AbstractApplicationContext.java:868) at org.springframework.context.support.AbstractApplicationContext.refresh(AbstractApplicationContext.java:549) at org.springframework.context.support.ClassPathXmlApplicationContext.<init > (ClassPathXmlApplicationContext.java:144) at org.springframework.context.support.ClassPathXmlApplicationContext.<init > (ClassPathXmlApplicationContext.java:85) at com.spring.ui.Client.main(Client.java:14) Caused by: org.springframework.beans.factory.NoUniqueBeanDefinitionException: No qualifying bean of type 'com.spring.dao.IAccountDao' available: expected single matching bean but found 2: accountDao1,accountDao2 at org.springframework.beans.factory.config.DependencyDescriptor.resolveNotUnique(DependencyDescriptor.java:215) at org.springframework.beans.factory.support.DefaultListableBeanFactory.doResolveDependency(DefaultListableBeanFactory.java:1113) at org.springframework.beans.factory.support.DefaultListableBeanFactory.resolveDependency(DefaultListableBeanFactory.java:1062) at org.springframework.beans.factory.annotation.AutowiredAnnotationBeanPostProcessor$AutowiredFieldElement.inject(AutowiredAnnotationBeanPostProcessor.java:583) ... 15 more
我们仔细看这一句报错:No qualifying bean of type 'com.spring.dao.IAccountDao' available: expected single matching bean but found 2: accountDao1,accountDao2:预期会有唯一的一个bean对象,但是找到了两个。
这时候我们修改AccountServiceImpl 如下:
1 2 3 4 5 6 7 8 9 @Component("accountService") public class AccountServiceImpl implements IAccountService @Autowired private IAccountDao accountDao1; public void saveAccount () accountDao1.saveAccount(); } }
再次运行就成功了
如果有一个匹配时,直接注入。如果有多个匹配时,首先按照类型圈定出匹配的对象,使用变量名称作为bean的ID查找,在圈定出来的里面继续查找。查找到注入成功。查找不到,注入失败。如果使用 @Autowired,有两个bean都符合相同类型时,需要改对应的ID,但这并不是我们想看见的。
@Qualifier
作用: 属性:
示例代码:
1 2 3 4 5 6 7 8 9 10 11 12 13 ** * 账户的业务层实现类 */ @Component("accountService") public class AccountServiceImpl implements IAccountService @Autowired @Qualifier(value = "accountDao1") private IAccountDao accountDao; public void saveAccount () accountDao.saveAccount(); } }
@Resource
作用: 属性:
示例代码:
1 2 3 4 5 6 7 8 9 10 11 12 13 14 @Component("accountService") public class AccountServiceImpl implements IAccountService @Resource(name = "accountDao1") private IAccountDao accountDao; public void saveAccount () accountDao.saveAccount(); } }
以上三个注入都只能注入其他bean类型的数据,而基本类型和String类型无法使用上述注解实现。
@Value
作用: 属性:
用于改变作用范围的 相当于 :<bean id=”” class=”” scope=”” >
@Scope 作用: 用于指定bean的作用范围属性:
示例代码:
1 2 3 4 5 6 7 8 9 10 11 12 13 public class Client public static void main (String[] args) ApplicationContext ac = new ClassPathXmlApplicationContext("bean.xml" ); IAccountService as = (IAccountService)ac.getBean("accountService" ); IAccountService as1 = (IAccountService)ac.getBean("accountService" ); System.out.println(as==as1); } }
输出结果为:true,证明默认是单例的。
使用@Scope注解,修改成多例
1 2 3 4 5 6 7 8 9 10 11 12 13 14 15 @Component("accountService") @Scope("prototype") public class AccountServiceImpl implements IAccountService @Resource(name = "accountDao1") private IAccountDao accountDao; public void saveAccount () accountDao.saveAccount(); } }
输出结果为:false,证明目前是多例的。
和生命周期相关的 相当于 :<bean id=”” class=”” init-method=”” destroy-method=”” >
@PostConstruct 作用: 用于指定初始化方法。
@PreDestroy 作用: 用于指定销毁方法。
示例代码:
1 2 3 4 5 6 7 8 9 10 11 12 13 14 15 16 17 18 19 20 21 22 23 24 25 @Component("accountService") public class AccountServiceImpl implements IAccountService @Resource(name = "accountDao1") private IAccountDao accountDao; @PostConstruct public void init () System.out.println("初始化方法执行了" ); } @PreDestroy public void destroy () System.out.println("销毁方法执行了" ); } public void saveAccount () accountDao.saveAccount(); } }
修改测试类:
1 2 3 4 5 6 7 8 9 10 11 12 13 14 public class Client public static void main (String[] args) ClassPathXmlApplicationContext ac=new ClassPathXmlApplicationContext("bean.xml" ); IAccountService as = (IAccountService)ac.getBean("accountService" ); as.saveAccount(); ac.close(); } }
输出:
Spring 的纯注解配置 写到此处,基于注解的 IoC 配置已经完成,但是有一个问题:我们依然离不开 spring 的 xml 配置文件,那么能不能不写这个 bean.xml,所有配置都用注解来实现呢?追求某种技术 。
待改造的问题 我们发现,之所以我们现在离不开 xml 配置文件,是因为我们有一些很关键的配置:
1 2 <context:component-scan base-package ="com.spring" > </context:component-scan >
如果以上也能用注解配置,那么我们就离脱离 xml 文件又进了一步。
另外,数据源和 runner 的配置也需要靠注解来实现,这样就可以完全脱离xml了。
1 2 3 4 5 6 7 8 9 10 11 12 13 14 <bean id ="runner" class ="org.apache.commons.dbutils.QueryRunner" scope ="prototype" > <constructor-arg name ="ds" ref ="dataSource" > </constructor-arg > </bean > <bean id ="dataSource" class ="com.mchange.v2.c3p0.ComboPooledDataSource" > <property name ="driverClass" value ="com.mysql.jdbc.Driver" > </property > <property name ="jdbcUrl" value ="jdbc:mysql://localhost:3306/eesy" > </property > <property name ="user" value ="root" > </property > <property name ="password" value ="1234" > </property > </bean >
新注解说明 @Configuration 作用: 用于指定当前类是一个 spring 配置类,当创建容器时会从该类上加载注解。获取容器时需要使用AnnotationApplicationContext(有@Configuration 注解的类.class)。细节: 当配置类作为AnnotationConfigApplicationContext对象创建的参数时,该注解可以不写。属性: value:用于指定配置类的字节码
示例代码:
1 2 3 4 5 6 @Configuration public class SpringConfiguration }
注意: 我们已经把配置文件用类来代替了,但是如何配置创建容器时要扫描的包呢?请看下一个注解。
@ComponentScan 作用:用于通过注解指定spring在创建容器时要扫描的包
value:它和basePackages的作用是一样的,都是用于指定创建容器时要扫描的包。
我们使用此注解就等同于在xml中配置了:
1 <context:component-scan base-package ="com.spring" > </context:component-scan >
示例代码:
1 2 3 4 5 6 @ComponentScan("com.spring") public class SpringConfiguration }
注意: 我们已经配置好了要扫描的包,但是数据源 和 QueryRunner 对象如何从配置文件中移除呢?请看下一个注解。
@Bean 作用:用于把当前方法的返回值作为bean对象存入spring的ioc容器中
name:用于指定bean的id。当不写时,默认值是当前方法的名称
当我们使用注解配置方法时,如果方法有参数,spring框架会去容器中查找有没有可用的bean对象。
查找的方式和Autowired注解的作用是一样的
1 2 3 4 5 6 7 8 9 10 11 12 13 14 15 16 17 18 19 20 21 22 23 24 25 26 27 28 29 30 31 32 33 public class JdbcConfig @Bean(name="runner") @Scope("prototype") public QueryRunner createQueryRunner (@Qualifier("ds2") DataSource dataSource) return new QueryRunner(dataSource); } @Bean(name="ds1") public DataSource createDataSource1 () try { ComboPooledDataSource ds = new ComboPooledDataSource(); ds.setDriverClass("com.mysql.jdbc.Driver" "); ds.setJdbcUrl(" jdbc:mysql: ds.setUser("root" ); ds.setPassword("1234" ); return ds; }catch (Exception e){ throw new RuntimeException(e); } } }
注意: 我们已经把数据源和 QueryRunner 从配置文件中移除了,此时可以删除 bean.xml 了。但是由于没有了配置文件,创建数据源的配置又都写死在类中了。如何把它们配置出来呢?请看下一个注解。
@PropertySource 作用:用于指定properties文件的位置
value:指定文件的名称和路径。如果是在类路径下,需要写上 classpath:
关键字:classpath,表示类路径下
示例代码:jdbc.properties 文件 1 2 3 4 jdbc.driver=com.mysql.jdbc.Driver jdbc.url=jdbc:mysql: jdbc.username=root jdbc.password=1234
1 2 3 4 5 6 7 8 9 10 11 12 13 14 15 16 17 18 19 20 21 22 23 24 25 26 27 28 29 30 31 32 33 34 35 36 37 38 39 40 41 42 43 44 45 46 public class JdbcConfig @Value("${jdbc.driver}") private String driver; @Value("${jdbc.url}") private String url; @Value("${jdbc.username}") private String username; @Value("${jdbc.password}") private String password; @Bean(name="runner") @Scope("prototype") public QueryRunner createQueryRunner (@Qualifier("ds2") DataSource dataSource) return new QueryRunner(dataSource); } @Bean(name="ds1") public DataSource createDataSource1 () try { ComboPooledDataSource ds = new ComboPooledDataSource(); ds.setDriverClass("com.mysql.jdbc.Driver" "); ds.setJdbcUrl(" jdbc:mysql: ds.setUser("root" ); ds.setPassword("1234" ); return ds; }catch (Exception e){ throw new RuntimeException(e); } } }
注意: 此时我们已经有了两个配置类,但是他们还没有关系。如何建立他们的关系呢?请看下一个注解。
@Import 作用:用于导入其他的配置类,在引入其他配置类时,可以不用再写@Configuration 注解。当然,写上也没问题。
1 ApplicationContext ac = new AnnotationConfigApplicationContext(SpringConfiguration.class);
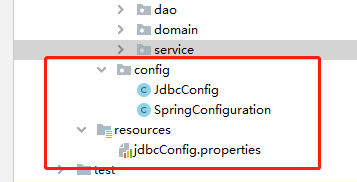
4.5.3 目录结构
5.Spring 整合 Junit 问题 在测试类中,每个测试方法都有以下两行代码:
1 2 ApplicationContext ac = new ClassPathXmlApplicationContext("bean.xml" ); IAccountService as = ac.getBean("accountService" ,IAccountService.class);
这两行代码的作用是获取容器,如果不写的话,直接会提示空指针异常。所以又不能轻易删掉。
解决思路分析 针对上述问题,我们需要的是程序能自动帮我们创建容器。一旦程序能自动为我们创建 spring 容器,我们就无须手动创建了,问题也就解决了。
我们都知道,junit 单元测试的原理(在 web 阶段课程中讲过),但显然,junit 是无法实现的,因为它自己都无法知晓我们是否使用了 spring 框架,更不用说帮我们创建 spring 容器了。不过好在,junit 给我们暴露了一个注解,可以让我们替换掉它的运行器。
这时,我们需要依靠 spring 框架,因为它提供了一个运行器,可以读取配置文件(或注解)来创建容器。我们只需要告诉它配置文件在哪就行了。
配置步骤 Spring整合junit的配置
locations:指定xml文件的位置,如果是类路径下,需要用 classpath:表明
classes:指定注解类所在地位置
注:当我们使用spring 5.x版本的时候,要求junit的jar必须是4.12及以上
使用@RunWith 注解替换原有运行器使用@RunWith 注解替换原有运行器1 2 3 4 5 6 @RunWith(SpringJUnit4ClassRunner.class) @ContextConfiguration(classes = SpringConfiguration.class) public class AccountServiceTest @Autowired private IAccountService as = null ; }
为什么不把测试类配到 xml 在解释这个问题之前,先解除大家的疑虑,配到 XML 中能不能用呢?
第一:当我们在 xml 中配置了一个 bean,spring 加载配置文件创建容器时,就会创建对象。
第二:测试类只是我们在测试功能时使用,而在项目中它并不参与程序逻辑,也不会解决需求上的问题,所以创建完了,并没有使用。那么存在容器中就会造成资源的浪费。
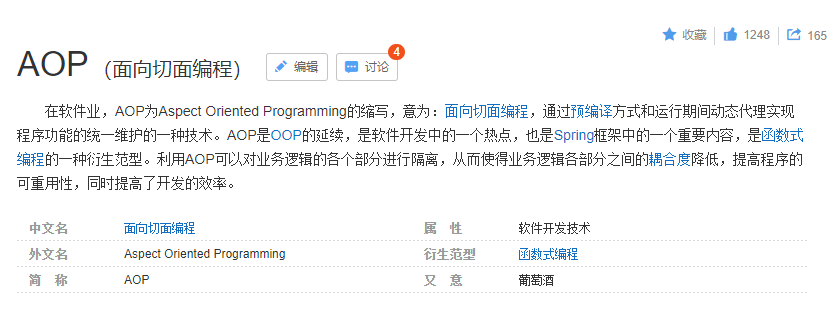
6.AOP概念和Spring中的AOP 什么是 AOP AOP:全称是 Aspect Oriented Programming 即:面向切面编程。
AOP 的作用、优势以及实现方式 作用 :在程序运行期间,不修改源码对已有方法进行增强。实现方式:**使用动态代理技术
AOP 相关术语 Joinpoint(连接点):**所谓连接点是指那些被拦截到的点。在 spring 中,这些点指的是方法,因为 spring 只支持方法类型的连接点。 Introduction(引介): Target(目标对象): Weaving(织入): Proxy(代理): Aspect(切面):
关于代理的选择 在 spring 中,框架会根据目标类是否实现了接口来决定采用哪种动态代理的方式。
基于 XML 的 AOP 配置 入门案例 创建一个maven工程,pom文件如下:
1 2 3 4 5 6 7 8 9 10 11 12 13 14 15 16 17 18 19 20 21 22 23 24 <?xml version="1.0" encoding="UTF-8"?> <project xmlns ="http://maven.apache.org/POM/4.0.0" xmlns:xsi ="http://www.w3.org/2001/XMLSchema-instance" xsi:schemaLocation ="http://maven.apache.org/POM/4.0.0 http://maven.apache.org/xsd/maven-4.0.0.xsd" > <modelVersion > 4.0.0</modelVersion > <groupId > org.example</groupId > <artifactId > SpringAop</artifactId > <version > 1.0-SNAPSHOT</version > <packaging > jar</packaging > <dependencies > <dependency > <groupId > org.springframework</groupId > <artifactId > spring-context</artifactId > <version > 5.0.2.RELEASE</version > </dependency > <dependency > <groupId > org.aspectj</groupId > <artifactId > aspectjweaver</artifactId > <version > 1.8.7</version > </dependency > </dependencies > </project >
创建账户的业务层接口
1 2 3 4 5 6 7 8 9 10 11 12 13 14 15 16 17 public interface IAccountService void saveAccount () void updateAccount (int i) int deleteAccount () }
创建账户业务层接口的实现类:
1 2 3 4 5 6 7 8 9 10 11 12 13 14 15 16 17 public class AccountServiceImpl implements IAccountService public void saveAccount () System.out.println("执行了保存" ); } public void updateAccount (int i) System.out.println("执行了更新" ); } public int deleteAccount () System.out.println("执行了删除" ); return 0 ; } }
创建工具类:
1 2 3 4 5 6 7 8 9 10 11 public class Logger public void printLog () System.out.println("Logger类中的printLog方法开始记录日志了。。。" ); } }
创建Spring配置文件bean.xml
1 2 3 4 5 6 7 8 9 10 11 12 13 14 15 16 17 18 19 20 21 22 23 24 25 26 27 28 29 30 31 32 33 34 35 36 37 38 39 40 41 42 43 <?xml version="1.0" encoding="UTF-8"?> <beans xmlns ="http://www.springframework.org/schema/beans" xmlns:xsi ="http://www.w3.org/2001/XMLSchema-instance" xmlns:aop ="http://www.springframework.org/schema/aop" xsi:schemaLocation ="http://www.springframework.org/schema/beans http://www.springframework.org/schema/beans/spring-beans.xsd http://www.springframework.org/schema/aop http://www.springframework.org/schema/aop/spring-aop.xsd" > <bean id ="accountService" class ="com.spring.service.impl.AccountServiceImpl" > </bean > <bean id ="logger" class ="com.spring.utils.Logger" > </bean > <aop:config > <aop:aspect id ="logAdvice" ref ="logger" > <aop:before method ="printLog" pointcut ="execution(public void com.spring.service.impl.AccountServiceImpl.saveAccount())" > </aop:before > </aop:aspect > </aop:config > </beans >
创建测试类:
1 2 3 4 5 6 7 8 9 10 11 12 13 public class AopTest public static void main (String[] args) ApplicationContext ac=new ClassPathXmlApplicationContext("bean.xml" ); IAccountService as=(IAccountService) ac.getBean("accountService" ); as.saveAccount(); } }
运行测试类结果如下:
1 2 Logger类中的printLog方法开始记录日志了。。。 执行了保存
至此,我们发现在需要增强的方法运行之前,日志类已经正常输出,并且在保存方法之前。说明我们搭建并运行成功。
修改测试类:
1 2 3 4 5 6 7 8 9 10 11 12 13 14 15 public class AopTest public static void main (String[] args) ApplicationContext ac=new ClassPathXmlApplicationContext("bean.xml" ); IAccountService as=(IAccountService) ac.getBean("accountService" ); as.saveAccount(); as.updateAccount(1 ); as.deleteAccount(); } }
运行测试类,发现只有保存方法增强了,那是为什么呢?
1 2 3 4 Logger类中的printLog方法开始记录日志了。。。 执行了保存 执行了更新 执行了删除
通过观察bean.xml,发现是因为我们配置切入点方法时候,只配置了保存方法。那么如果想所有方法都进行增强该如何配置呢?
1 2 3 4 5 6 7 8 <aop:config > <aop:aspect id ="logAdvice" ref ="logger" > <aop:before method ="printLog" pointcut ="execution(public void com.spring.service.impl.AccountServiceImpl.saveAccount())" > </aop:before > </aop:aspect > </aop:config >
切入点表达式写法 关键字:execution(表达式)
表达式:1 访问修饰符 返回值 包名.包名.包名....类名.方法名(参数列表)
标准表达式写法:1 public void com.spring.service.impl.AccountServiceImpl.saveAccount()
访问修饰符可以省略:1 void com.spring.service.impl.AccountServiceImpl.saveAccount()
返回值可以使用通配符,表示任意返回值(void改成*)1 * com.spring.service.impl.AccountServiceImpl.saveAccount()
包名可以使用通配符,表示任意包。但凡有几级包,就需要写几个*1 * *.*.*.*.AccountServiceImpl.saveAccount()
包名可以使用..表示当前包及其子包1 * *..AccountServiceImpl.saveAccount()
类名和方法名都可以使用*来实现通配
参数列表:全通配写法
全通配写法:
实际开发中切入点表达式的通常写法: 1 * com.spring.service.impl.*.*(..)
四种常用通知类型 我们修改Logger 类如下:
1 2 3 4 5 6 7 8 9 10 11 12 13 14 15 16 17 18 19 20 21 22 23 24 25 26 27 28 29 30 31 32 ** * 用于记录日志的工具类,它里面提供了公共的代码 */ public class Logger public void befoPrintLog () System.out.println("Logger类中的前置通知方法开始记录日志了。。。" ); } public void afterReturningPrintLog () System.out.println("Logger类中的后置通知方法开始记录日志了。。。" ); } public void afterThrowingPrintLog () System.out.println("Logger类中的异常通知方法开始记录日志了。。。" ); } public void afterPrintLog () System.out.println("Logger类中的最终通知方法开始记录日志了。。。" ); } }
修改bean.xml如下:
1 2 3 4 5 6 7 8 9 10 11 12 13 14 15 16 17 18 19 20 21 22 23 24 25 26 27 28 29 30 <?xml version="1.0" encoding="UTF-8"?> <beans xmlns ="http://www.springframework.org/schema/beans" xmlns:xsi ="http://www.w3.org/2001/XMLSchema-instance" xmlns:aop ="http://www.springframework.org/schema/aop" xsi:schemaLocation ="http://www.springframework.org/schema/beans http://www.springframework.org/schema/beans/spring-beans.xsd http://www.springframework.org/schema/aop http://www.springframework.org/schema/aop/spring-aop.xsd" > <bean id ="accountService" class ="com.spring.service.impl.AccountServiceImpl" > </bean > <bean id ="logger" class ="com.spring.utils.Logger" > </bean > <aop:config > <aop:aspect id ="logAdvice" ref ="logger" > <aop:before method ="befoPrintLog" pointcut ="execution(* com.spring.service.impl.*.*(..))" > </aop:before > <aop:after-returning method ="afterReturningPrintLog" pointcut ="execution(* com.spring.service.impl.*.*(..))" > </aop:after-returning > <aop:after-throwing method ="afterThrowingPrintLog" pointcut ="execution(* com.spring.service.impl.*.*(..))" > </aop:after-throwing > <aop:after method ="afterPrintLog" pointcut ="execution(* com.spring.service.impl.*.*(..))" > </aop:after > </aop:aspect > </aop:config > </beans >
修改测试类如下:
1 2 3 4 5 6 7 8 9 10 11 12 13 public class AopTest public static void main (String[] args) ApplicationContext ac=new ClassPathXmlApplicationContext("bean.xml" ); IAccountService as=(IAccountService) ac.getBean("accountService" ); as.saveAccount(); } }
输出结果:
1 2 3 4 Logger类中的前置通知方法开始记录日志了。。。 执行了保存 Logger类中的后置通知方法开始记录日志了。。。 Logger类中的最终通知方法开始记录日志了。。。
总结
前置通知:在切入点方法执行之前执行
后置通知:在切入点方法正常执行后执行,它和异常通知永远只能执行一个
异常通知: 在切入点方法执行产生异常之后执行,它和后置通知永远只能执行一个
最终通知:无论切入点方法是否正常执行,它都会在其后面执行
通用化切入点表达式 我们查看bean.xml中,切入点表达式都是一样的,同一个切入点表达式需要写很多次。那么有没有简便的办法呢?
1 2 3 4 5 6 7 8 9 10 11 12 13 14 15 <aop:config > <aop:aspect id ="logAdvice" ref ="logger" > <aop:before method ="befoPrintLog" pointcut ="execution(* com.spring.service.impl.*.*(..))" > </aop:before > <aop:after-returning method ="afterReturningPrintLog" pointcut ="execution(* com.spring.service.impl.*.*(..))" > </aop:after-returning > <aop:after-throwing method ="afterThrowingPrintLog" pointcut ="execution(* com.spring.service.impl.*.*(..))" > </aop:after-throwing > <aop:after method ="afterPrintLog" pointcut ="execution(* com.spring.service.impl.*.*(..))" > </aop:after > </aop:aspect > </aop:config > </beans >
配置切入点表达式:
id属性用于指定表达式的唯一标识。expression属性用于指定表达式内容
此标签写在aop:aspect标签内部只能当前切面使用。
它还可以写在aop:aspect外面,此时就变成了所有切面可用
1 2 3 4 5 6 7 8 9 10 11 12 13 14 15 16 17 18 19 20 21 22 23 24 25 26 27 28 29 30 31 32 33 34 35 <?xml version="1.0" encoding="UTF-8"?> <beans xmlns ="http://www.springframework.org/schema/beans" xmlns:xsi ="http://www.w3.org/2001/XMLSchema-instance" xmlns:aop ="http://www.springframework.org/schema/aop" xsi:schemaLocation ="http://www.springframework.org/schema/beans http://www.springframework.org/schema/beans/spring-beans.xsd http://www.springframework.org/schema/aop http://www.springframework.org/schema/aop/spring-aop.xsd" > <bean id ="accountService" class ="com.spring.service.impl.AccountServiceImpl" > </bean > <bean id ="logger" class ="com.spring.utils.Logger" > </bean > <aop:config > <aop:pointcut id ="pt1" expression ="execution(* com.spring.service.impl.*.*(..))" > </aop:pointcut > <aop:aspect id ="logAdvice" ref ="logger" > <aop:before method ="befoPrintLog" pointcut-ref ="pt1" > </aop:before > <aop:after-returning method ="afterReturningPrintLog" pointcut-ref ="pt1" > </aop:after-returning > <aop:after-throwing method ="afterThrowingPrintLog" pointcut-ref ="pt1" > </aop:after-throwing > <aop:after method ="afterPrintLog" pointcut-ref ="pt1" > </aop:after > </aop:aspect > </aop:config > </beans >
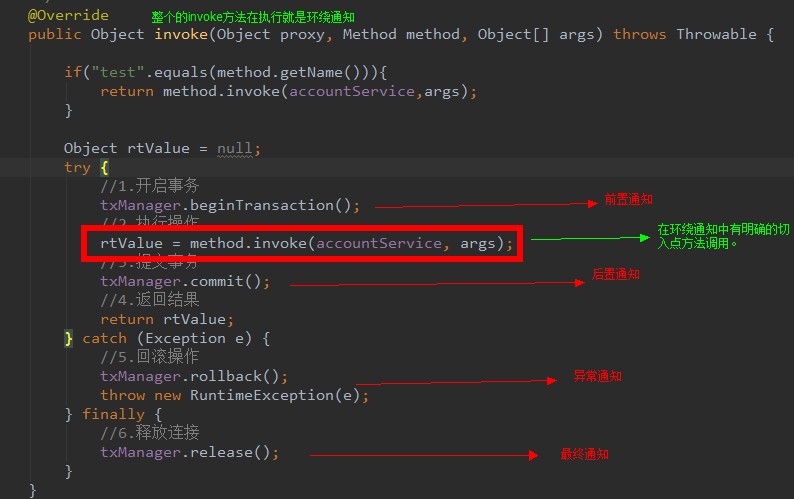
环绕通知 作用 :用于配置环绕通知属性:
method:指定通知中方法的名称。
pointct:定义切入点表达式
pointcut-ref:指定切入点表达式的引用
注意:
修改bean.xml如下:
1 2 3 4 5 6 7 8 9 10 11 12 13 14 15 16 17 18 19 20 21 22 23 24 25 26 27 28 29 <?xml version="1.0" encoding="UTF-8"?> <beans xmlns ="http://www.springframework.org/schema/beans" xmlns:xsi ="http://www.w3.org/2001/XMLSchema-instance" xmlns:aop ="http://www.springframework.org/schema/aop" xsi:schemaLocation ="http://www.springframework.org/schema/beans http://www.springframework.org/schema/beans/spring-beans.xsd http://www.springframework.org/schema/aop http://www.springframework.org/schema/aop/spring-aop.xsd" > <bean id ="accountService" class ="com.spring.service.impl.AccountServiceImpl" > </bean > <bean id ="logger" class ="com.spring.utils.Logger" > </bean > <aop:config > <aop:pointcut id ="pt1" expression ="execution(* com.spring.service.impl.*.*(..))" > </aop:pointcut > <aop:aspect id ="logAdvice" ref ="logger" > <aop:around method ="aroundPrintLog" pointcut-ref ="pt1" > </aop:around > </aop:aspect > </aop:config > </beans >
在Logger类中新增aroundPrintLog方法
1 2 3 4 5 6 7 8 9 10 11 12 13 14 15 16 17 18 19 20 21 22 23 public Object aroundPringLog (ProceedingJoinPoint pjp) Object rtValue = null ; try { Object[] args = pjp.getArgs(); System.out.println("写在pjp.proceed方法前,就是前置通知" ); rtValue = pjp.proceed(args); System.out.println("写在pjp.proceed方法前,就是后置通知" ); return rtValue; }catch (Throwable t){ System.out.println("写在pjp.proceed方法前,就是异常通知" ); throw new RuntimeException(t); }finally { System.out.println("写在pjp.proceed方法前,就是最终通知" ); } }
基于注解的 AOP 配置 入门案例 修改Logger类为,当前注释掉了环绕通知:
1 2 3 4 5 6 7 8 9 10 11 12 13 14 15 16 17 18 19 20 21 22 23 24 25 26 27 28 29 30 31 32 33 34 35 36 37 38 39 40 41 42 43 44 45 46 47 48 49 50 51 52 53 54 55 56 57 58 59 60 61 62 63 64 65 66 67 68 69 70 @Component("logger") @Aspect public class Logger @Pointcut("execution(* com.spring.service.impl.*.*(..))") private void pt1 () @Before("pt1()") public void befoPrintLog () System.out.println("Logger类中的前置通知方法开始记录日志了。。。" ); } @AfterReturning("pt1()") public void afterReturningPrintLog () System.out.println("Logger类中的后置通知方法开始记录日志了。。。" ); } @AfterThrowing("pt1()") public void afterThrowingPrintLog () System.out.println("Logger类中的异常通知方法开始记录日志了。。。" ); } @After("pt1()") public void afterPrintLog () System.out.println("Logger类中的最终通知方法开始记录日志了。。。" ); } public Object aroundPrintLog (ProceedingJoinPoint pjp) Object rtValue = null ; try { Object[] args = pjp.getArgs(); System.out.println("写在pjp.proceed方法前,就是前置通知" ); rtValue = pjp.proceed(args); System.out.println("写在pjp.proceed方法前,就是后置通知" ); return rtValue; }catch (Throwable t){ System.out.println("写在pjp.proceed方法前,就是异常通知" ); throw new RuntimeException(t); }finally { System.out.println("写在pjp.proceed方法前,就是最终通知" ); } } }
修改bean.xml
1 2 3 4 5 6 7 8 9 10 11 12 13 14 15 16 17 18 <?xml version="1.0" encoding="UTF-8"?> <beans xmlns ="http://www.springframework.org/schema/beans" xmlns:xsi ="http://www.w3.org/2001/XMLSchema-instance" xmlns:aop ="http://www.springframework.org/schema/aop" xmlns:context ="http://www.springframework.org/schema/context" xsi:schemaLocation ="http://www.springframework.org/schema/beans http://www.springframework.org/schema/beans/spring-beans.xsd http://www.springframework.org/schema/aop http://www.springframework.org/schema/aop/spring-aop.xsd http://www.springframework.org/schema/context http://www.springframework.org/schema/context/spring-context.xsd" > <context:component-scan base-package ="com.spring" > </context:component-scan > <aop:aspectj-autoproxy > </aop:aspectj-autoproxy > </beans >
执行测试类,这里我们先把环绕通知注释掉:
1 2 3 4 5 6 7 8 9 10 11 12 13 public class AopTest public static void main (String[] args) ApplicationContext ac=new ClassPathXmlApplicationContext("bean.xml" ); IAccountService as=(IAccountService) ac.getBean("accountService" ); as.saveAccount(); } }
运行结果:
1 2 3 4 Logger类中的前置通知方法开始记录日志了。。。 执行了保存 Logger类中的最终通知方法开始记录日志了。。。 Logger类中的后置通知方法开始记录日志了。。。
发现基于注解的AOP配置会存在顺序的问题。
我们继续修改Logger,我们放开环绕通知,注释掉其它的
1 2 3 4 5 6 7 8 9 10 11 12 13 14 15 16 17 18 19 20 21 22 23 24 25 26 27 28 29 30 31 32 33 34 35 36 37 38 39 40 41 42 43 44 45 46 47 48 49 50 51 52 53 54 55 56 57 58 59 60 61 62 63 64 65 66 67 68 69 @Component("logger") @Aspect public class Logger @Pointcut("execution(* com.spring.service.impl.*.*(..))") private void pt1 () public void befoPrintLog () System.out.println("Logger类中的前置通知方法开始记录日志了。。。" ); } public void afterReturningPrintLog () System.out.println("Logger类中的后置通知方法开始记录日志了。。。" ); } public void afterThrowingPrintLog () System.out.println("Logger类中的异常通知方法开始记录日志了。。。" ); } public void afterPrintLog () System.out.println("Logger类中的最终通知方法开始记录日志了。。。" ); } @Around(("pt1()")) public Object aroundPrintLog (ProceedingJoinPoint pjp) Object rtValue = null ; try { Object[] args = pjp.getArgs(); System.out.println("写在pjp.proceed方法前,就是前置通知" ); rtValue = pjp.proceed(args); System.out.println("写在pjp.proceed方法前,就是后置通知" ); return rtValue; }catch (Throwable t){ System.out.println("写在pjp.proceed方法前,就是异常通知" ); throw new RuntimeException(t); }finally { System.out.println("写在pjp.proceed方法前,就是最终通知" ); } } }
执行测试类:
1 2 3 4 5 6 7 8 9 10 11 12 13 public class AopTest public static void main (String[] args) ApplicationContext ac=new ClassPathXmlApplicationContext("bean.xml" ); IAccountService as=(IAccountService) ac.getBean("accountService" ); as.saveAccount(); } }
运行结果:
1 2 3 4 写在pjp.proceed方法前,就是前置通知 执行了保存 写在pjp.proceed方法前,就是后置通知 写在pjp.proceed方法前,就是最终通知
我们发现,基于注解的AOP,采用环绕通知可以避免顺序不对的问题。
不使用 XML 的配置方式 @EnableAspectJAutoProxy //设置Spring开启注解AOP的支持
我们在Logger中添加@EnableAspectJAutoProxy即可替代xml中<aop:aspectj-autoproxy></aop:aspectj-autoproxy>
参考:
1 2 3 4 5 6 7 8 9 10 11 12 13 14 15 16 17 18 19 20 21 22 23 24 25 26 27 28 29 30 31 32 33 34 35 36 37 38 39 40 41 42 43 44 45 46 47 48 49 50 51 52 53 54 55 56 57 58 59 60 61 62 63 64 65 66 67 68 69 70 @Component("logger") @Aspect @EnableAspectJAutoProxy public class Logger @Pointcut("execution(* com.spring.service.impl.*.*(..))") private void pt1 () public void befoPrintLog () System.out.println("Logger类中的前置通知方法开始记录日志了。。。" ); } public void afterReturningPrintLog () System.out.println("Logger类中的后置通知方法开始记录日志了。。。" ); } public void afterThrowingPrintLog () System.out.println("Logger类中的异常通知方法开始记录日志了。。。" ); } public void afterPrintLog () System.out.println("Logger类中的最终通知方法开始记录日志了。。。" ); } @Around(("pt1()")) public Object aroundPrintLog (ProceedingJoinPoint pjp) Object rtValue = null ; try { Object[] args = pjp.getArgs(); System.out.println("写在pjp.proceed方法前,就是前置通知" ); rtValue = pjp.proceed(args); System.out.println("写在pjp.proceed方法前,就是后置通知" ); return rtValue; }catch (Throwable t){ System.out.println("写在pjp.proceed方法前,就是异常通知" ); throw new RuntimeException(t); }finally { System.out.println("写在pjp.proceed方法前,就是最终通知" ); } } }
7.Spring 中的 JdbcTemplate JdbcTemplate 概述 它是 spring 框架中提供的一个对象,是对原始 Jdbc API 对象的简单封装。spring 框架为我们提供了很多的操作模板类。
JdbcTemplate 对象的创建 我们可以参考它的源码,来一探究竟:
1 2 3 4 5 6 7 8 9 10 11 public JdbcTemplate () } public JdbcTemplate (DataSource dataSource) setDataSource(dataSource); afterPropertiesSet(); } public JdbcTemplate (DataSource dataSource, boolean lazyInit) setDataSource(dataSource); setLazyInit(lazyInit); afterPropertiesSet(); }
除了默认构造函数之外,都需要提供一个数据源。既然有set方法,依据我们之前学过的依赖注入,我们可以在配置文件中配置这些对象。
JdbcTemplate入门案例 新建一个Maven工程,pom文件依赖如下:
1 2 3 4 5 6 7 8 9 10 11 12 13 14 15 16 17 18 19 20 21 22 23 24 25 <dependencies > <dependency > <groupId > org.springframework</groupId > <artifactId > spring-context</artifactId > <version > 5.0.2.RELEASE</version > </dependency > <dependency > <groupId > org.springframework</groupId > <artifactId > spring-jdbc</artifactId > <version > 5.0.2.RELEASE</version > </dependency > <dependency > <groupId > org.springframework</groupId > <artifactId > spring-tx</artifactId > <version > 5.0.2.RELEASE</version > </dependency > <dependency > <groupId > mysql</groupId > <artifactId > mysql-connector-java</artifactId > <version > 5.1.6</version > </dependency > </dependencies >
创建一个一张名为account表
1 2 3 4 5 6 7 8 9 create table account( id int primary key auto_increment, name varchar (40 ), money float )character set utf8 collate utf8_general_ci; insert into account(name,money) values ('aaa' ,1000 );insert into account(name,money) values ('bbb' ,1000 );insert into account(name,money) values ('ccc' ,1000 );
创建数据库对应实体:
1 2 3 4 5 6 7 8 9 10 11 12 13 14 15 16 17 18 19 20 21 22 23 24 25 26 27 28 29 30 31 32 33 34 35 36 37 38 39 40 41 42 public class Account implements Serializable private Integer id; private String name; private Float money; public Integer getId () return id; } public void setId (Integer id) this .id = id; } public String getName () return name; } public void setName (String name) this .name = name; } public Float getMoney () return money; } public void setMoney (Float money) this .money = money; } @Override public String toString () return "Account{" + "id=" + id + ", name='" + name + '\'' + ", money=" + money + '}' ; } }
创建一个测试类:
1 2 3 4 5 6 7 8 9 10 11 12 13 14 15 16 17 18 19 20 21 public class jdbcTemplateDemo1 public static void main (String[] args) DriverManagerDataSource dataSource=new DriverManagerDataSource(); dataSource.setDriverClassName("com.mysql.jdbc.Driver" ); dataSource.setUrl("jdbc:mysql://localhost:3306/spring" ); dataSource.setUsername("root" ); dataSource.setPassword("root" ); JdbcTemplate jdbcTemplate=new JdbcTemplate(); jdbcTemplate.setDataSource(dataSource); jdbcTemplate.execute("insert into account(name,money) values('ddd',1000) " ); } }
执行测试类,数据已经成功插入到数据库。这也是JdbcTemplate的最基本用法。但是我们都把配置写死在类中了,导致了硬编码。那么我们应该把它交给Spring来管理。
JdbcTemplate在Spring的IOC中使用 在resources目录下,创建Spring配置文件bean.xml:
1 2 3 4 5 6 7 8 9 10 11 12 13 14 15 16 17 18 19 <?xml version="1.0" encoding="UTF-8"?> <beans xmlns ="http://www.springframework.org/schema/beans" xmlns:xsi ="http://www.w3.org/2001/XMLSchema-instance" xsi:schemaLocation ="http://www.springframework.org/schema/beans http://www.springframework.org/schema/beans/spring-beans.xsd" > <bean id ="jdbcTemplate" class ="org.springframework.jdbc.core.JdbcTemplate" > <property name ="dataSource" ref ="dataSource" > </property > </bean > <bean id ="dataSource" class ="org.springframework.jdbc.datasource.DriverManagerDataSource" > <property name ="driverClassName" value ="com.mysql.jdbc.Driver" > </property > <property name ="url" value ="jdbc:mysql://localhost:3306/spring" > </property > <property name ="username" value ="root" > </property > <property name ="password" value ="1234" > </property > </bean > </beans >
新建测试类:
1 2 3 4 5 6 7 8 9 10 11 12 13 public class jdbcTemplateDemo2 public static void main (String[] args) ApplicationContext ac=new ClassPathXmlApplicationContext("bean.xml" ); JdbcTemplate jt=ac.getBean("jdbcTemplate" ,JdbcTemplate.class); jt.execute("insert into account(name,money) values('eee',8000) " ); } }
再次执行,依旧能正常插入数据库,说明我们的改造已经成功。
JdbcTemplate的CRUD操作 新建测试类:
1 2 3 4 5 6 7 8 9 10 11 12 13 14 15 16 17 18 19 20 21 22 23 24 25 26 27 28 29 30 31 32 33 34 35 36 37 38 39 40 41 42 43 44 45 46 47 48 49 50 51 52 53 54 55 56 public class jdbcTemplateDemo3 public static void main (String[] args) ApplicationContext ac=new ClassPathXmlApplicationContext("bean.xml" ); JdbcTemplate jt=ac.getBean("jdbcTemplate" ,JdbcTemplate.class); jt.update("insert into account(name,money) values (?,?)" ,"fff" ,6666f ); jt.update("update account set name=?,money=? where id=?" ,"test" ,4567 ,1 ); jt.update("delete from account where id=?" ,6 ); List<Account> accounts = jt.query("select * from account where money > ?" ,new AccountRowMapper(),1000f ); List<Account> accounts=jt.query("select * from account where money > ?" ,new BeanPropertyRowMapper<Account>(Account.class),100f ); for (Account account:accounts){ System.out.println(account); } List<Account> accounts=jt.query("select * from account where id = ?" ,new BeanPropertyRowMapper<Account>(Account.class),1 ); System.out.println(accounts.isEmpty()?"没有内容" :accounts.get(0 )); Long count=jt.queryForObject("select count(*) from account where money > ?" ,Long.class,1000f ); System.out.println(count); } class AccountRowMapper implements RowMapper <Account > @Override public Account mapRow (ResultSet rs, int rowNum) throws SQLException Account account = new Account(); account.setId(rs.getInt("id" )); account.setName(rs.getString("name" )); account.setMoney(rs.getFloat("money" )); return account; } }
注意:执行测试方法时,请注释掉无关方法,保证每次只执行一个sql。
JdbcTemplate在Dao中的使用 创建持久层接口:
1 2 3 4 5 6 7 8 9 10 11 12 13 14 15 16 17 18 19 20 21 22 23 24 25 26 public interface IAccountDao Account findAccountById (Integer accountId) ; void updateAccount (Account account) Account findAccountByName (String accountName) ; }
创建持久层接口实现类:
1 2 3 4 5 6 7 8 9 10 11 12 13 14 15 16 17 18 19 20 21 22 23 24 25 26 27 28 29 30 31 32 public class AccountDaoImpl implements IAccountDao private JdbcTemplate jdbcTemplate; public void setJdbcTemplate (JdbcTemplate jdbcTemplate) this .jdbcTemplate = jdbcTemplate; } @Override public Account findAccountById (Integer accountId) List<Account> accounts=jdbcTemplate.query("select * from account where id=?" ,new BeanPropertyRowMapper<Account>(Account.class),accountId); return accounts.isEmpty()?null :accounts.get(0 ); } @Override public Account findAccountByName (String accountName) List<Account> accounts=jdbcTemplate.query("select * from account where name=?" ,new BeanPropertyRowMapper<Account>(Account.class),accountName); if (accounts.isEmpty()){ return null ; } if (accounts.size()>1 ){ throw new RuntimeException("结果集不唯一" ); } return accounts.get(0 ); } @Override public void updateAccount (Account account) jdbcTemplate.update("update account set name=?,money=? where id=?" ,account.getName(),account.getMoney(),account.getId()); } }
修改bean.xml,把accountDao交给Spring管理
1 2 3 4 5 6 7 8 9 10 11 12 13 14 15 16 17 18 19 20 21 22 23 <?xml version="1.0" encoding="UTF-8"?> <beans xmlns ="http://www.springframework.org/schema/beans" xmlns:xsi ="http://www.w3.org/2001/XMLSchema-instance" xsi:schemaLocation ="http://www.springframework.org/schema/beans http://www.springframework.org/schema/beans/spring-beans.xsd" > <bean id ="accountDao" class ="com.spring.dao.impl.AccountDaoImpl" > <property name ="jdbcTemplate" ref ="jdbcTemplate" > </property > </bean > <bean id ="jdbcTemplate" class ="org.springframework.jdbc.core.JdbcTemplate" > <property name ="dataSource" ref ="dataSource" > </property > </bean > <bean id ="dataSource" class ="org.springframework.jdbc.datasource.DriverManagerDataSource" > <property name ="driverClassName" value ="com.mysql.jdbc.Driver" > </property > <property name ="url" value ="jdbc:mysql://localhost:3306/spring" > </property > <property name ="username" value ="root" > </property > <property name ="password" value ="1234" > </property > </bean > </beans >
新建测试类:
1 2 3 4 5 6 7 8 9 10 11 12 13 14 15 16 17 18 19 public class jdbcTemplateDemo4 public static void main (String[] args) ApplicationContext ac=new ClassPathXmlApplicationContext("bean.xml" ); IAccountDao accountDao=ac.getBean("accountDao" ,IAccountDao.class); Account account=accountDao.findAccountById(1 ); System.out.println(account); account.setMoney(10000f ); accountDao.updateAccount(account); } }
执行测试类,我们发现能正常查询,也能正常更新操作。
让 dao 继承 JdbcDaoSupport 修改AccountDaoImpl:
1 2 3 4 5 6 7 8 9 10 11 12 13 14 15 16 17 18 19 20 21 22 23 24 25 26 27 public class AccountDaoImpl extends JdbcDaoSupport implements IAccountDao @Override public Account findAccountById (Integer accountId) List<Account> accounts=super .getJdbcTemplate().query("select * from account where id=?" ,new BeanPropertyRowMapper<Account>(Account.class),accountId); return accounts.isEmpty()?null :accounts.get(0 ); } @Override public Account findAccountByName (String accountName) List<Account> accounts=super .getJdbcTemplate().query("select * from account where name=?" ,new BeanPropertyRowMapper<Account>(Account.class),accountName); if (accounts.isEmpty()){ return null ; } if (accounts.size()>1 ){ throw new RuntimeException("结果集不唯一" ); } return accounts.get(0 ); } @Override public void updateAccount (Account account) super .getJdbcTemplate().update("update account set name=?,money=? where id=?" ,account.getName(),account.getMoney(),account.getId()); } }
修改bean.xml:
1 2 3 4 5 6 7 8 9 10 11 12 13 14 15 16 17 18 19 <?xml version="1.0" encoding="UTF-8"?> <beans xmlns ="http://www.springframework.org/schema/beans" xmlns:xsi ="http://www.w3.org/2001/XMLSchema-instance" xsi:schemaLocation ="http://www.springframework.org/schema/beans http://www.springframework.org/schema/beans/spring-beans.xsd" > <bean id ="accountDao" class ="com.spring.dao.impl.AccountDaoImpl" > <property name ="dataSource" ref ="dataSource" > </property > </bean > <bean id ="dataSource" class ="org.springframework.jdbc.datasource.DriverManagerDataSource" > <property name ="driverClassName" value ="com.mysql.jdbc.Driver" > </property > <property name ="url" value ="jdbc:mysql://localhost:3306/spring" > </property > <property name ="username" value ="root" > </property > <property name ="password" value ="1234" > </property > </bean > </beans >
新建测试类:
1 2 3 4 5 6 7 8 9 10 11 12 13 14 15 16 17 18 19 public class jdbcTemplateDemo4 public static void main (String[] args) ApplicationContext ac=new ClassPathXmlApplicationContext("bean.xml" ); IAccountDao accountDao=ac.getBean("accountDao" ,IAccountDao.class); Account account=accountDao.findAccountById(1 ); System.out.println(account); account.setMoney(30000f ); accountDao.updateAccount(account); } }
这样可以在多个dao的情况下,去除掉注入和重复定义的代码。
JdbcTemplate在Dao中的使用 和 让 dao 继承 JdbcDaoSupport。两版 Dao 有什么区别呢?
第一种在 Dao 类中定义 JdbcTemplate 的方式,适用于所有配置方式(xml 和注解都可以)。
第二种让 Dao 继承 JdbcDaoSupport 的方式,只能用于基于 XML 的方式,注解用不了。
8.Spring 中的事务控制 Spring 事务控制我们要明确的 第一:JavaEE 体系进行分层开发,事务处理位于业务层,Spring 提供了分层设计业务层的事务处理解决方案。我们学习的重点是使用配置的方式实现。
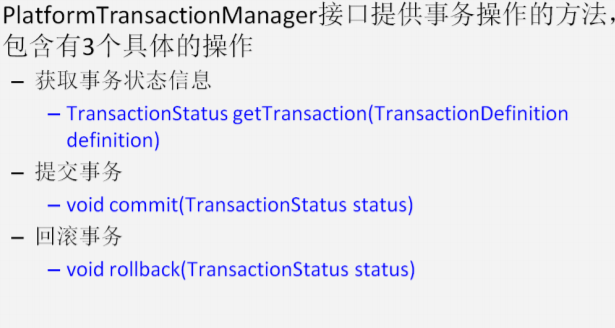
Spring 中事务控制的 API 介绍 此接口是 spring 的事务管理器,它里面提供了我们常用的操作事务的方法,如下:
我们在开发中都是使用它的实现类,如下:真正管理事务的对象 DataSourceTransactionManager 使用 SpringJDBC 或 iBatis 进行持久化数据时使用HibernateTransactionManager 使用Hibernate 版本进行持久化数据时使用
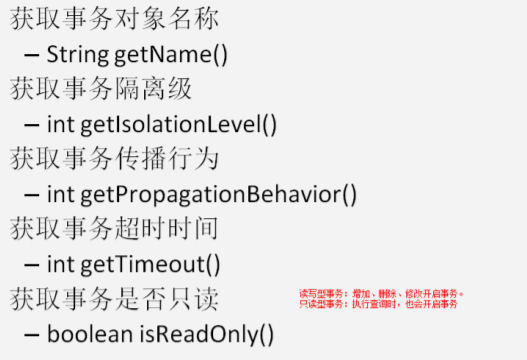
TransactionDefinition 它是事务的定义信息对象,里面有如下方法
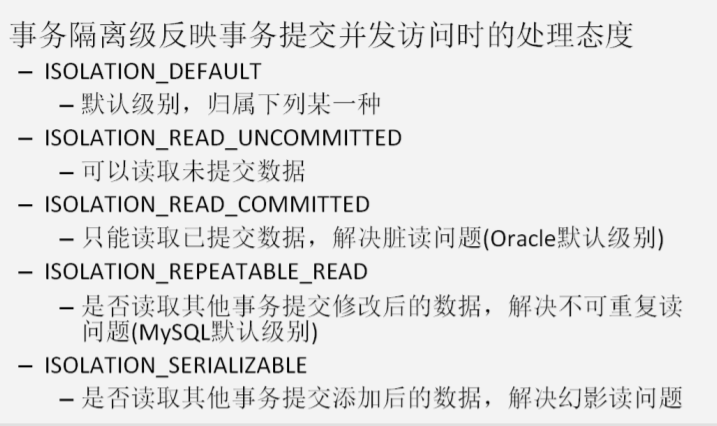
事务的隔离级别
事务的传播行为 REQUIRED:如果当前没有事务,就新建一个事务,如果已经存在一个事务中,加入到这个事务中。一般的选择(默认值) SUPPORTS:支持当前事务,如果当前没有事务,就以非事务方式执行(没有事务)
超时时间 默认值是-1,没有超时限制。如果有,以秒为单位进行设置。
是否是只读事务 建议查询时设置为只读。
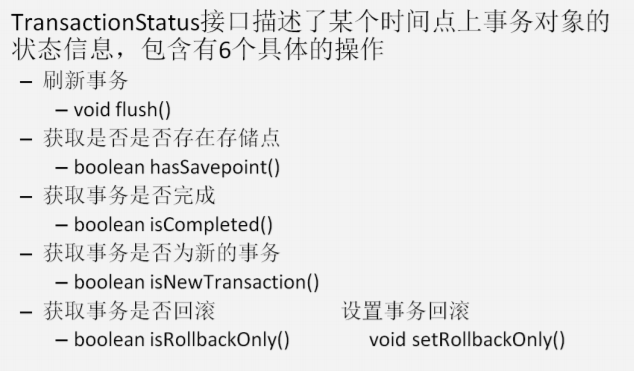
TransactionStatus 此接口提供的是事务具体的运行状态,方法介绍如下图:
基于 XML 的声明式事务控制重点 创建一个Maven工程,pom文件如下:
1 2 3 4 5 6 7 8 9 10 11 12 13 14 15 16 17 18 19 20 21 22 23 24 25 26 27 28 29 30 31 32 33 34 35 36 37 38 39 40 41 42 43 44 45 46 47 48 49 50 51 52 53 54 55 56 <?xml version="1.0" encoding="UTF-8"?> <project xmlns ="http://maven.apache.org/POM/4.0.0" xmlns:xsi ="http://www.w3.org/2001/XMLSchema-instance" xsi:schemaLocation ="http://maven.apache.org/POM/4.0.0 http://maven.apache.org/xsd/maven-4.0.0.xsd" > <modelVersion > 4.0.0</modelVersion > <groupId > org.spring</groupId > <artifactId > SpringTx</artifactId > <version > 1.0-SNAPSHOT</version > <packaging > jar</packaging > <dependencies > <dependency > <groupId > org.springframework</groupId > <artifactId > spring-context</artifactId > <version > 5.0.2.RELEASE</version > </dependency > <dependency > <groupId > org.springframework</groupId > <artifactId > spring-jdbc</artifactId > <version > 5.0.2.RELEASE</version > </dependency > <dependency > <groupId > org.springframework</groupId > <artifactId > spring-tx</artifactId > <version > 5.0.2.RELEASE</version > </dependency > <dependency > <groupId > mysql</groupId > <artifactId > mysql-connector-java</artifactId > <version > 5.1.6</version > </dependency > <dependency > <groupId > org.aspectj</groupId > <artifactId > aspectjweaver</artifactId > <version > 1.8.7</version > </dependency > <dependency > <groupId > junit</groupId > <artifactId > junit</artifactId > <version > 4.12</version > <scope > test</scope > </dependency > <dependency > <groupId > org.springframework</groupId > <artifactId > spring-test</artifactId > <version > 5.0.2.RELEASE</version > </dependency > </dependencies > </project >
创建一个名为Dao的包,在Dao层下创建接口类IAccountDao
1 2 3 4 5 6 7 8 9 10 11 12 13 14 15 16 17 18 19 20 21 22 23 24 25 public interface IAccountDao Account findAccountById (Integer accountId) ; Account findAccountByName (String accountName) ; void updateAccount (Account account) }
在Dao层下创建一个名为impl的包,在impl包下创建接口实现类AccountDaoImpl
1 2 3 4 5 6 7 8 9 10 11 12 13 14 15 16 17 18 19 20 21 22 23 24 25 26 27 28 public class AccountDaoImpl extends JdbcDaoSupport implements IAccountDao @Override public Account findAccountById (Integer accountId) List<Account> accounts = super .getJdbcTemplate().query("select * from account where id = ?" ,new BeanPropertyRowMapper<Account>(Account.class),accountId); return accounts.isEmpty()?null :accounts.get(0 ); } @Override public Account findAccountByName (String accountName) List<Account> accounts = super .getJdbcTemplate().query("select * from account where name = ?" ,new BeanPropertyRowMapper<Account>(Account.class),accountName); if (accounts.isEmpty()){ return null ; } if (accounts.size()>1 ){ throw new RuntimeException("结果集不唯一" ); } return accounts.get(0 ); } @Override public void updateAccount (Account account) super .getJdbcTemplate().update("update account set name=?,money=? where id=?" ,account.getName(),account.getMoney(),account.getId()); } }
创建一个名为domain的包,与dao同一层级。在domain下创建实体类Account并实现序列化
1 2 3 4 5 6 7 8 9 10 11 12 13 14 15 16 17 18 19 20 21 22 23 24 25 26 27 28 29 30 31 32 33 34 35 36 37 38 39 40 41 42 public class Account implements Serializable private Integer id; private String name; private Float money; public Integer getId () return id; } public void setId (Integer id) this .id = id; } public String getName () return name; } public void setName (String name) this .name = name; } public Float getMoney () return money; } public void setMoney (Float money) this .money = money; } @Override public String toString () return "Account{" + "id=" + id + ", name='" + name + '\'' + ", money=" + money + '}' ; } }
创建一个名为service的包,与Dao同一层级,在service包下创建创建接口IAccountService
1 2 3 4 5 6 7 8 9 10 11 12 13 14 15 16 17 18 19 20 21 public interface IAccountService Account findAccountById (Integer accountId) ; void transfer (String sourceName, String targetName, Float money) }
在service包下创建一个名为impl的包,在impl包下创建实现类AccountServiceImpl
1 2 3 4 5 6 7 8 9 10 11 12 13 14 15 16 17 18 19 20 21 22 23 24 25 26 27 28 29 30 31 32 33 34 35 36 37 38 39 public class AccountServiceImpl implements IAccountService private IAccountDao accountDao; public void setAccountDao (IAccountDao accountDao) this .accountDao = accountDao; } @Override public Account findAccountById (Integer accountId) return accountDao.findAccountById(accountId); } @Override public void transfer (String sourceName, String targetName, Float money) System.out.println("transfer...." ); Account source = accountDao.findAccountByName(sourceName); Account target = accountDao.findAccountByName(targetName); source.setMoney(source.getMoney()-money); target.setMoney(target.getMoney()+money); accountDao.updateAccount(source); accountDao.updateAccount(target); } }
在resources目录下,创建bean.xml
1 2 3 4 5 6 7 8 9 10 11 12 13 14 15 16 17 18 19 20 21 22 23 24 25 26 27 28 29 30 31 32 33 34 35 36 37 38 39 40 41 42 43 44 45 46 47 48 49 50 51 52 53 54 55 56 57 58 59 60 61 62 63 64 65 66 67 68 69 70 71 72 73 74 75 76 <?xml version="1.0" encoding="UTF-8"?> <beans xmlns ="http://www.springframework.org/schema/beans" xmlns:xsi ="http://www.w3.org/2001/XMLSchema-instance" xmlns:aop ="http://www.springframework.org/schema/aop" xmlns:tx ="http://www.springframework.org/schema/tx" xsi:schemaLocation =" http://www.springframework.org/schema/beans http://www.springframework.org/schema/beans/spring-beans.xsd http://www.springframework.org/schema/tx http://www.springframework.org/schema/tx/spring-tx.xsd http://www.springframework.org/schema/aop http://www.springframework.org/schema/aop/spring-aop.xsd" > <bean id ="accountService" class ="com.spring.service.impl.AccountServiceImpl" > <property name ="accountDao" ref ="accountDao" > </property > </bean > <bean id ="accountDao" class ="com.spring.dao.impl.AccountDaoImpl" > <property name ="dataSource" ref ="dataSource" > </property > </bean > <bean id ="dataSource" class ="org.springframework.jdbc.datasource.DriverManagerDataSource" > <property name ="driverClassName" value ="com.mysql.jdbc.Driver" > </property > <property name ="url" value ="jdbc:mysql://localhost:3306/spring" > </property > <property name ="username" value ="root" > </property > <property name ="password" value ="1234" > </property > </bean > <bean id ="transactionManager" class ="org.springframework.jdbc.datasource.DataSourceTransactionManager" > <property name ="dataSource" ref ="dataSource" > </property > </bean > <tx:advice id ="txAdvice" transaction-manager ="transactionManager" > <tx:attributes > <tx:method name ="*" propagation ="REQUIRED" read-only ="false" /> <tx:method name ="find*" propagation ="SUPPORTS" read-only ="true" > </tx:method > </tx:attributes > </tx:advice > <aop:config > <aop:pointcut id ="pt1" expression ="execution(* com.spring.service.impl.*.*(..))" > </aop:pointcut > <aop:advisor advice-ref ="txAdvice" pointcut-ref ="pt1" > </aop:advisor > </aop:config > </beans >
创建测试类:
1 2 3 4 5 6 7 8 9 10 11 12 13 14 15 @RunWith(SpringJUnit4ClassRunner.class) @ContextConfiguration(locations = "classpath:bean.xml") public class AccountServiceTest @Autowired private IAccountService as; @Test public void testTransfer () as.transfer("aaa" ,"bbb" ,100f ); } }
经过测试,如果程序出现异常,比如int i=1/0,事务会自动回滚。如果正常,则会提交事务。
基于注解的声明式事务控制 创建一个Maven工程,pom文件如下:
1 2 3 4 5 6 7 8 9 10 11 12 13 14 15 16 17 18 19 20 21 22 23 24 25 26 27 28 29 30 31 32 33 34 35 36 37 38 39 40 41 42 43 44 45 46 47 48 49 50 51 52 53 54 55 56 <?xml version="1.0" encoding="UTF-8"?> <project xmlns ="http://maven.apache.org/POM/4.0.0" xmlns:xsi ="http://www.w3.org/2001/XMLSchema-instance" xsi:schemaLocation ="http://maven.apache.org/POM/4.0.0 http://maven.apache.org/xsd/maven-4.0.0.xsd" > <modelVersion > 4.0.0</modelVersion > <groupId > org.spring</groupId > <artifactId > SpringTx</artifactId > <version > 1.0-SNAPSHOT</version > <packaging > jar</packaging > <dependencies > <dependency > <groupId > org.springframework</groupId > <artifactId > spring-context</artifactId > <version > 5.0.2.RELEASE</version > </dependency > <dependency > <groupId > org.springframework</groupId > <artifactId > spring-jdbc</artifactId > <version > 5.0.2.RELEASE</version > </dependency > <dependency > <groupId > org.springframework</groupId > <artifactId > spring-tx</artifactId > <version > 5.0.2.RELEASE</version > </dependency > <dependency > <groupId > mysql</groupId > <artifactId > mysql-connector-java</artifactId > <version > 5.1.6</version > </dependency > <dependency > <groupId > org.aspectj</groupId > <artifactId > aspectjweaver</artifactId > <version > 1.8.7</version > </dependency > <dependency > <groupId > junit</groupId > <artifactId > junit</artifactId > <version > 4.12</version > <scope > test</scope > </dependency > <dependency > <groupId > org.springframework</groupId > <artifactId > spring-test</artifactId > <version > 5.0.2.RELEASE</version > </dependency > </dependencies > </project >
创建一个名为Dao的包,在Dao层下创建接口类IAccountDao
1 2 3 4 5 6 7 8 9 10 11 12 13 14 15 16 17 18 19 20 21 22 23 24 25 public interface IAccountDao Account findAccountById (Integer accountId) ; Account findAccountByName (String accountName) ; void updateAccount (Account account) }
在Dao层下创建一个名为impl的包,在impl包下创建接口实现类AccountDaoImpl
1 2 3 4 5 6 7 8 9 10 11 12 13 14 15 16 17 18 19 20 21 22 23 24 25 26 27 28 29 30 31 32 @Repository("accountDao") public class AccountDaoImpl implements IAccountDao @Autowired private JdbcTemplate jdbcTemplate; @Override public Account findAccountById (Integer accountId) List<Account> accounts = jdbcTemplate.query("select * from account where id = ?" ,new BeanPropertyRowMapper<Account>(Account.class),accountId); return accounts.isEmpty()?null :accounts.get(0 ); } @Override public Account findAccountByName (String accountName) List<Account> accounts = jdbcTemplate.query("select * from account where name = ?" ,new BeanPropertyRowMapper<Account>(Account.class),accountName); if (accounts.isEmpty()){ return null ; } if (accounts.size()>1 ){ throw new RuntimeException("结果集不唯一" ); } return accounts.get(0 ); } @Override public void updateAccount (Account account) jdbcTemplate.update("update account set name=?,money=? where id=?" ,account.getName(),account.getMoney(),account.getId()); } }
创建一个名为domain的包,与dao同一层级。在domain下创建实体类Account并实现序列化
1 2 3 4 5 6 7 8 9 10 11 12 13 14 15 16 17 18 19 20 21 22 23 24 25 26 27 28 29 30 31 32 33 34 35 36 37 38 39 40 41 42 public class Account implements Serializable private Integer id; private String name; private Float money; public Integer getId () return id; } public void setId (Integer id) this .id = id; } public String getName () return name; } public void setName (String name) this .name = name; } public Float getMoney () return money; } public void setMoney (Float money) this .money = money; } @Override public String toString () return "Account{" + "id=" + id + ", name='" + name + '\'' + ", money=" + money + '}' ; } }
创建一个名为service的包,与Dao同一层级,在service包下创建创建接口IAccountService
1 2 3 4 5 6 7 8 9 10 11 12 13 14 15 16 17 18 19 20 21 public interface IAccountService Account findAccountById (Integer accountId) ; void transfer (String sourceName, String targetName, Float money) }
在service包下创建一个名为impl的包,在impl包下创建实现类AccountServiceImpl
1 2 3 4 5 6 7 8 9 10 11 12 13 14 15 16 17 18 19 20 21 22 23 24 25 26 27 28 29 30 31 32 33 34 35 36 37 38 39 @Service("accountService") @Transactional(readOnly = true, propagation = Propagation.SUPPORTS) public class AccountServiceImpl implements IAccountService @Autowired private IAccountDao accountDao; @Override public Account findAccountById (Integer accountId) return accountDao.findAccountById(accountId); } @Override @Transactional(readOnly = false, propagation = Propagation.REQUIRED) public void transfer (String sourceName, String targetName, Float money) System.out.println("transfer...." ); Account source = accountDao.findAccountByName(sourceName); Account target = accountDao.findAccountByName(targetName); source.setMoney(source.getMoney()-money); target.setMoney(target.getMoney()+money); accountDao.updateAccount(source); accountDao.updateAccount(target); } }
该注解的属性和 xml 中的属性含义一致。该注解可以出现在接口上,类上和方法上。
在resources目录下,创建bean.xml
1 2 3 4 5 6 7 8 9 10 11 12 13 14 15 16 17 18 19 20 21 22 23 24 25 26 27 28 29 30 31 32 33 34 35 36 37 38 39 40 41 42 43 44 45 46 47 48 49 <?xml version="1.0" encoding="UTF-8"?> <beans xmlns ="http://www.springframework.org/schema/beans" xmlns:xsi ="http://www.w3.org/2001/XMLSchema-instance" xmlns:aop ="http://www.springframework.org/schema/aop" xmlns:tx ="http://www.springframework.org/schema/tx" xmlns:context ="http://www.springframework.org/schema/context" xsi:schemaLocation =" http://www.springframework.org/schema/beans http://www.springframework.org/schema/beans/spring-beans.xsd http://www.springframework.org/schema/tx http://www.springframework.org/schema/tx/spring-tx.xsd http://www.springframework.org/schema/aop http://www.springframework.org/schema/aop/spring-aop.xsd http://www.springframework.org/schema/context http://www.springframework.org/schema/context/spring-context.xsd" > <context:component-scan base-package ="com.spring" > </context:component-scan > <bean id ="jdbcTemplate" class ="org.springframework.jdbc.core.JdbcTemplate" > <property name ="dataSource" ref ="dataSource" > </property > </bean > <bean id ="dataSource" class ="org.springframework.jdbc.datasource.DriverManagerDataSource" > <property name ="driverClassName" value ="com.mysql.jdbc.Driver" > </property > <property name ="url" value ="jdbc:mysql://localhost:3306/spring" > </property > <property name ="username" value ="root" > </property > <property name ="password" value ="1234" > </property > </bean > <bean id ="transactionManager" class ="org.springframework.jdbc.datasource.DataSourceTransactionManager" > <property name ="dataSource" ref ="dataSource" > </property > </bean > <tx:annotation-driven transaction-manager ="transactionManager" > </tx:annotation-driven > </beans >
创建测试类:
1 2 3 4 5 6 7 8 9 10 11 12 13 14 15 @RunWith(SpringJUnit4ClassRunner.class) @ContextConfiguration(locations = "classpath:bean.xml") public class AccountServiceTest @Autowired private IAccountService as; @Test public void testTransfer () as.transfer("aaa" ,"bbb" ,100f ); } }
经过测试,如果程序出现异常,比如int i=1/0,事务会自动回滚。如果正常,则会提交事务。
基于纯注解的声明式事务控制 建一个Maven工程,pom文件如下:
1 2 3 4 5 6 7 8 9 10 11 12 13 14 15 16 17 18 19 20 21 22 23 24 25 26 27 28 29 30 31 32 33 34 35 36 37 38 39 40 41 42 43 44 45 46 47 48 49 50 51 52 53 54 55 56 <?xml version="1.0" encoding="UTF-8"?> <project xmlns ="http://maven.apache.org/POM/4.0.0" xmlns:xsi ="http://www.w3.org/2001/XMLSchema-instance" xsi:schemaLocation ="http://maven.apache.org/POM/4.0.0 http://maven.apache.org/xsd/maven-4.0.0.xsd" > <modelVersion > 4.0.0</modelVersion > <groupId > org.spring</groupId > <artifactId > SpringTx</artifactId > <version > 1.0-SNAPSHOT</version > <packaging > jar</packaging > <dependencies > <dependency > <groupId > org.springframework</groupId > <artifactId > spring-context</artifactId > <version > 5.0.2.RELEASE</version > </dependency > <dependency > <groupId > org.springframework</groupId > <artifactId > spring-jdbc</artifactId > <version > 5.0.2.RELEASE</version > </dependency > <dependency > <groupId > org.springframework</groupId > <artifactId > spring-tx</artifactId > <version > 5.0.2.RELEASE</version > </dependency > <dependency > <groupId > mysql</groupId > <artifactId > mysql-connector-java</artifactId > <version > 5.1.6</version > </dependency > <dependency > <groupId > org.aspectj</groupId > <artifactId > aspectjweaver</artifactId > <version > 1.8.7</version > </dependency > <dependency > <groupId > junit</groupId > <artifactId > junit</artifactId > <version > 4.12</version > <scope > test</scope > </dependency > <dependency > <groupId > org.springframework</groupId > <artifactId > spring-test</artifactId > <version > 5.0.2.RELEASE</version > </dependency > </dependencies > </project >
创建一个名为Dao的包,在Dao层下创建接口类IAccountDao
1 2 3 4 5 6 7 8 9 10 11 12 13 14 15 16 17 18 19 20 21 22 23 24 25 public interface IAccountDao Account findAccountById (Integer accountId) ; Account findAccountByName (String accountName) ; void updateAccount (Account account) }
在Dao层下创建一个名为impl的包,在impl包下创建接口实现类AccountDaoImpl
1 2 3 4 5 6 7 8 9 10 11 12 13 14 15 16 17 18 19 20 21 22 23 24 25 26 27 28 29 30 31 32 @Repository("accountDao") public class AccountDaoImpl implements IAccountDao @Autowired private JdbcTemplate jdbcTemplate; @Override public Account findAccountById (Integer accountId) List<Account> accounts = jdbcTemplate.query("select * from account where id = ?" ,new BeanPropertyRowMapper<Account>(Account.class),accountId); return accounts.isEmpty()?null :accounts.get(0 ); } @Override public Account findAccountByName (String accountName) List<Account> accounts = jdbcTemplate.query("select * from account where name = ?" ,new BeanPropertyRowMapper<Account>(Account.class),accountName); if (accounts.isEmpty()){ return null ; } if (accounts.size()>1 ){ throw new RuntimeException("结果集不唯一" ); } return accounts.get(0 ); } @Override public void updateAccount (Account account) jdbcTemplate.update("update account set name=?,money=? where id=?" ,account.getName(),account.getMoney(),account.getId()); } }
创建一个名为domain的包,与dao同一层级。在domain下创建实体类Account并实现序列化
1 2 3 4 5 6 7 8 9 10 11 12 13 14 15 16 17 18 19 20 21 22 23 24 25 26 27 28 29 30 31 32 33 34 35 36 37 38 39 40 41 42 public class Account implements Serializable private Integer id; private String name; private Float money; public Integer getId () return id; } public void setId (Integer id) this .id = id; } public String getName () return name; } public void setName (String name) this .name = name; } public Float getMoney () return money; } public void setMoney (Float money) this .money = money; } @Override public String toString () return "Account{" + "id=" + id + ", name='" + name + '\'' + ", money=" + money + '}' ; } }
创建一个名为service的包,与Dao同一层级,在service包下创建创建接口IAccountService
1 2 3 4 5 6 7 8 9 10 11 12 13 14 15 16 17 18 19 20 21 public interface IAccountService Account findAccountById (Integer accountId) ; void transfer (String sourceName, String targetName, Float money) }
在service包下创建一个名为impl的包,在impl包下创建实现类AccountServiceImpl
1 2 3 4 5 6 7 8 9 10 11 12 13 14 15 16 17 18 19 20 21 22 23 24 25 26 27 28 29 30 31 32 33 34 35 36 37 38 39 @Service("accountService") @Transactional(readOnly = true, propagation = Propagation.SUPPORTS) public class AccountServiceImpl implements IAccountService @Autowired private IAccountDao accountDao; @Override public Account findAccountById (Integer accountId) return accountDao.findAccountById(accountId); } @Override @Transactional(readOnly = false, propagation = Propagation.REQUIRED) public void transfer (String sourceName, String targetName, Float money) System.out.println("transfer...." ); Account source = accountDao.findAccountByName(sourceName); Account target = accountDao.findAccountByName(targetName); source.setMoney(source.getMoney()-money); target.setMoney(target.getMoney()+money); accountDao.updateAccount(source); accountDao.updateAccount(target); } }
在config目录下,创建JdbcConfig.java
1 2 3 4 5 6 7 8 9 10 11 12 13 14 15 16 17 18 19 20 21 22 23 24 25 26 27 28 29 30 31 32 33 34 35 36 37 38 39 public class JdbcConfig @Value("${jdbc.driver}") private String driver; @Value("${jdbc.url}") private String url; @Value("${jdbc.username}") private String username; @Value("${jdbc.password}") private String password; @Bean(name = "jdbcTemplate") public JdbcTemplate jdbcTemplate (DataSource dataSource) return new JdbcTemplate(dataSource); } @Bean(name = "dataSource") public DataSource createDataSource () DriverManagerDataSource ds=new DriverManagerDataSource(); ds.setDriverClassName(driver); ds.setUrl(url); ds.setUsername(username); ds.setPassword(password); return ds; } }
在config目录下,创建TransactionConfig.java
1 2 3 4 5 6 7 8 9 10 11 12 13 14 15 16 public class TransactionConfig @Bean(name = "transactionManager") public PlatformTransactionManager createTransactionManager (DataSource dataSource) return new DataSourceTransactionManager(dataSource); } }
在resources目录下,创建jdbcConfig.properties
1 2 3 4 jdbc.driver=com.mysql.jdbc.Driver jdbc.url=jdbc:mysql: jdbc.username=root jdbc.password=1234
在config目录下,创建SpringConfiguration.java
1 2 3 4 5 6 7 8 9 10 @Configuration @ComponentScan("com.spring") @Import({JdbcConfig.class,TransactionConfig.class}) @PropertySource("jdbcConfig.properties") @EnableTransactionManagement public class SpringConfiguration }
创建测试类:
1 2 3 4 5 6 7 8 9 10 11 12 13 14 15 @RunWith(SpringJUnit4ClassRunner.class) @ContextConfiguration(classes = SpringConfiguration.class) public class AccountServiceTest @Autowired private IAccountService as; @Test public void testTransfer () as.transfer("aaa" ,"bbb" ,100f ); } }
经过测试,如果程序出现异常,比如int i=1/0,事务会自动回滚。如果正常,则会提交事务。到此,我们纯注解配置已经完成。
